Category Archives: bread

chicken banh mi

Lemongrass and Ginger Grilled Chicken Banh Mi with Ginger Lime Sriracha Mayo

chicken banh mi

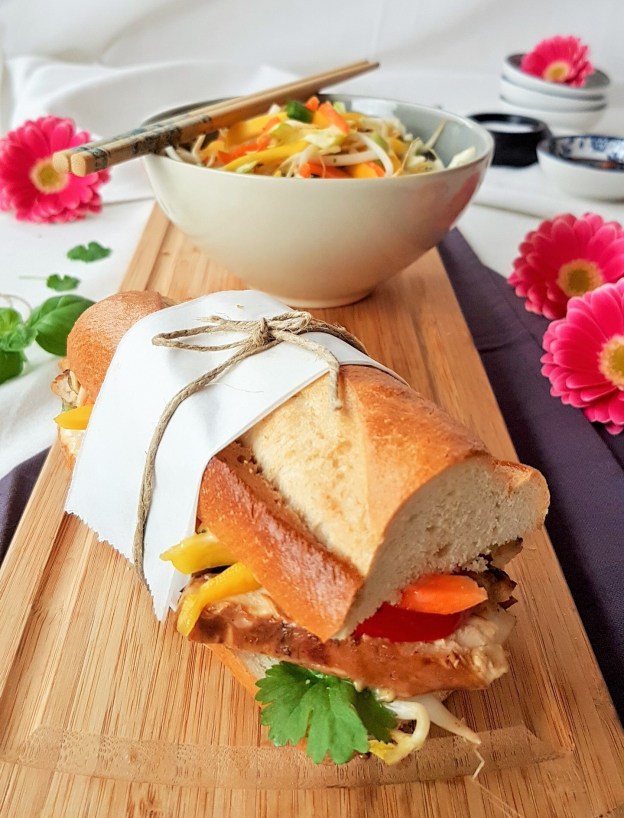
…AND CRUNCHY VIETNAMESE MANGO SLAW!

Don’t let the long list of ingredients put you off, this is actually very easy, there are just a few steps that need to be taken, and believe me you won’t be sorry. Because these Lemon grass and Ginger grilled Chicken Banh Mi are the business!
The smell in my kitchen when I was grilling the chicken was incredible…
Grilling the chicken gives it an amazing caramelized crispy sticky outside. Serve on a warm baguette with crunchy Vietnamese Slaw and drizzle with the ginger lime Sriracha mayo. Full of sweet, savoury, sour and spicy notes
Good times, I promise!
________________________________________
SERVES 4

INGREDIENTS BANH MI:

• 4 Baguettes
• Grilled Chicken, sliced
• Vietnamese Slaw
• Ginger Lime Sriracha Mayo
• Cucumber, about half, sliced
• Cilantro (Koriander) , a handful. Roughly chopped
• Lots of paper napkins!

CHICKEN:
• 1 pounds chicken breasts or thighs, de-boned

MARINADE:
• 2 tbsp. soy sauce
• 2 tbsp. fish sauce
• 1 tbsp. coconut sugar
• 1 tbsp. honey
• 2 tbsp. chopped cilantro
• 2 tsp. fresh peeled and grated ginger
• 1 lemongrass stalk, bashed with the side of a meat hammer
• 1 tablespoon chopped Thai (or Sweet) basil
• 1 tsp. hot sauce
• Zest and juice of 1 medium lime
• 1 garlic clove , minced (about 1 teaspoon)
• Cooking oil spray
• Freshly ground black pepper

chicken banh mi

METHOD:
1. Whisk all marinade ingredients together in a measuring cup. Pour over chicken thighs or breasts and seal bag or place in a large dish and cover.
2. Marinate for at one hour or up to 4 hours in the refrigerator.
3. Remove from fridge and bring to room temperature one hour before grilling.
4. Heat your griddle pan.
5. Remove chicken from bag. Pat dry with kitchen paper. Discard marinade.
6. Spray both sides of thighs with oil. Place on griddle pan.
7. Season generously with black pepper.
8. Grill for about 2 minutes on each side on high.
9. Lower the heat.
10. Continue grilling until thighs are done, about 7 to 10 minutes more. Chicken will feel firm to the touch. Let rest for 5 minutes before cutting.

chicken banh mi

chicken banh mi

VIETNAMESE MANGO SLAW:
• 2 cups shredded cabbage
• 4 spring onions, finely sliced
• 2 medium carrots, cut in to julienne
• 1/2 Mango, peeled and cut in to julienne
• 1 cup bean sprouts
• 1/2 bunch coriander, washed
• 1/2 bunch Thai basil
• 1 long red chili, de-seeded
• 1/2 garlic clove, finely chopped
• 1 tsp. ginger, peeled and grated
• 1/4 cup lemon juice
• 2 tbsp fish sauce
• 2 tbsp. ginger syrup (from the jar of candied stem ginger)

chicken banh mi
METHOD SLAW:
1. Place cabbage in a bowl with the spring onions, bean sprouts and carrots. Roughly chop the coriander and Thai basil and add to the bowl. Cut the chilli in half then cut across into fine strips.
2. Add the chilli to the bowl.
3. Place the remaining ingredients into a small jar and shake well until the sugar has dissolved. Dress the salad.
4. Put on some plastic disposable gloves and start mixing well with your hands – make sure it all gets covered in dressing or it will taste bland.

GINGER LIME SRIRACHA MAYO:
• 3/4 cup Mayo
• 1 piece candied stem ginger in syrup, finely chopped or grated
• 2 tsp. Sriracha sauce
• Juice of half a lime
METHOD MAYO:
1. Place all the ingredients in a bowl and mix with a spoon.

chicken banh mi
TO ASSEMBLE THE BANH MI:
Pre heat the oven to 200° C / 400° F
1. Slightly dampen the baguettes with a little water. Wrap them in foil and heat them in the oven for about 10 minutes.
2. Remove from oven. Remove foil and discard.
3. Carefully slice open. Hot!
4. Spread a generous amount of the Ginger Lime Sriracha mayo on the bottom of the baguette.
5. Then a layer of sliced cucumber.
6. Then the grilled chicken.
7. Top with Vietnamese Slaw
8. Sprinkle over some cilantro
9. Drizzle over some more mayo
10. Put the top of the Baguette on.

Serve with plenty of paper napkins!

Enjoy!
Myra XO

chicken banh mi

everyday spelt bread

Everyday Spelt Bread

everyday spelt bread

This is the easiest bread recipe I have in my repertoire, I make it all the time. Mostly because it is a no-brainer recipe and some times because it’s even quicker than going to the store to buy a loaf, or because it’s raining and I don’t want to leave the house. Whatever the reason may be, this fool proof recipe is one I use time and time again .

Pro’s :

  1. delicious
  2. Soft
  3. Warm
  4. Healthier
  5. No additives
  6. Cheap
  7. Home made

Con’s:

  1. Nope…can’t think of any.

everyday spelt bread


Prep time : 10 minutes

Cooking time : 30 minutes

oven temp : 200 C / 400 F


Ingredients:

  • 2 teaspoons active dry yeast
  • 3/4 cup warm water
  • 1/2 cup milk at room temperature
  • 2 tablespoons honey
  • 3 1/2- 4 cups whole grain spelt flour
  • 2 tablespoons extra-light olive oil
  • 1 teaspoon salt
  • extra olive oil or melted butter for brushing loaf

everyday spelt bread

Instructions:

Combine the warm water, yeast and honey in a large jug, and let it sit and “proof” for 10 minutes. Add the milk and stir.

Place the flour in the bowl of your mixer, fitted with the kneading hook, pour the water yeast mixture into the bowl of flour with the motor running on the lowest setting. Add the salt and olive oil. Once incorporated you can turn the mixer setting on higher. Knead for about 7 minutes.

Cover the bowl with a damp cloth and let the dough rise for 45-60 minutes in a warm place. It should double in size.

Grease a loaf tin with melted butter.

Turn the dough out on a floured surface and knead a few minutes. Shape into a loaf and place in loaf tin.

Let rise again for 30 minutes covered with an oiled piece of plastic wrap.

Preheat your oven to 200 C/400 F , remove plastic wrap and place loaf on a rack in the middle of the oven. Bake the loaf for about 30 minutes turning half way, tap the loaf to see if it’s fully baked, it should sound hollow. Once baked , brush the crust with some butter. This is an optional step but I love the way the crust gets a bit softer and glossier. Let it cool in the pan for a few minutes before removing it to cool completely on a wire rack.

Enjoy!

Myra xo

everyday spelt bread

If you make this recipe please be sure to leave a comment and/or give this recipe a rating! I love hearing from you. And please don’t forget to tag me on Instagram so I can see your creations!

pepper honey hamburger buns

Black Pepper Honey Brioche Hamburger Buns

pepper honey hamburger buns

I have a problem with store bought hamburger buns, the ones you buy in a plastic bag, the ones that fall apart by the first bite, the ones that have an insipid dull factory flavor of nothing that completely leaves you hanging and doesn’t really do your scrumptious burger justice.
You know the kind right?
A good burger, is crunchy on the outside, juicy on the inside with a good amount of flavor, you need a bun that can keep up, a bun that can endure the whole burger eating experience until the very last bite. You’re with me, I know it.

Well I’ve got you covered. Give these a try for your next cook-out and your store-bought-bun-days are over… forever….THE END


Prep time : 15 minutes plus rising 2 hrs.
Cooking time : 15 minutes
Makes: 8 large buns


INGREDIENTS:

• 3/4 C. warm water
• 1/4 C. warm milk, soy or regular. (I use Soy)
• 2 ½ tsp. instant yeast
• 3 tbsp. honey
• 2 eggs, at room temperature
• 3 tbsp. butter, melted and cooled
• 4 ½ C. Spelt flour
• 1 1/2 tsp. salt
• 1 tsp. Black cracked pepper * SEE NOTE
• 1 egg beaten for glaze
• 1 tsp. honey
• 1 or 2 tbsp. sesame seeds for sprinkling on top
* NOTE : Two ways for cracking the pepper, either set your pepper mill to the course setting or crack whole pepper corns in a pestle and mortar.

brioche hamburger buns

pepper honey hamburger buns

INSTRUCTIONS:

Mix the first 4 ingredients in a bowl and let the yeast proof for 5 minutes until frothy.
Beat the eggs and the butter together,
In the bowl of a food processor set with the hook attachment, add the flour, salt and cracked pepper and give it a stir, slowly add the eggs and butter mixture and continue with the yeast/milk mixture.
Set the processor on low and knead for 10 minutes.
Turn out the dough on a floured surface, and give it a few turns and shape into a ball.
Put into a bowl sprayed with oil and cover with oil sprayed cling film. Let rise in a warm place for 2 hours. Until double in size.
Take the dough out of the bowl and put it back on your work surface sprinkled with a little flour. Knead a few times and shape into 8 buns. Put them on a baking tray covered with baking paper. Brush the buns with the beaten egg and honey mix and sprinkle with sesame seeds. Cover the buns with cling film that has been sprayed with oil. Let rise for another 30 min.
Preheat the oven to 400 °F.
Bake the buns for 14 -15 minutes, turning them once half way. Let cool on a rack.
If using for burgers, split them in half and toast slightly on the bbq for a few minutes.
Leftover buns freeze well.

Enjoy!
Myra XO

pepper honey hamburger buns

pesto bread knots

Pesto Knots with Garlic Butter

pesto bread knots

This has to be the best dinner roll of all times. Soft dough filled with pesto and tied in a cute little knot.

pesto bread knots

INGREDIENTS:
• 200 ml / 1 cup minus 2 tbsp. hand warm milk (you can use unsweetened soy)
• 42 gr. / 1.5 oz. fresh yeast
• 2 tbsp. honey
• 500 gr. / 1 3/4 cup Spelt flour (type 630) or all purpose flour
• 1 tsp salt
• 2 medium eggs at room temperature
• 100 gr. butter at room temperature
• 2 tbsp. Pesto
• 1/4 cup butter
• 1 tbsp. chopped parsley
• 2 garlic cloves, peeled and grated

pesto bread knots

pesto bread knots

INSTRUCTIONS:
Bring the milk to hand warm temperature, either in the microwave or on top of the stove. Make sure it’s not to warm or you will kill the yeast.
Crumble in the yeast and the honey. Give it a stir and set aside. It will start to bubble up.
In the bowl of your stand mixer add the flour and salt and stir to combine. Make a well in the middle and add the butter, the two eggs and the milk mixture. Knead on medium for about 6 minutes. Add a little more flour if it seems too wet. It will be a sticky dough however.
Cover with cling film and leave to rise for thirty minutes.
Roll out the dough into a rectangle of about 35 x 45 cm / 14 x 16 ” , cut in half lengthwise and spread one tablespoon of pesto down the middle.
Roll each half into a long rope and cut each roll into 6 equal parts.
Shape into knots tucking the ends under, free style it because you can’t go wrong here
Leave the knots to rise for 10 minutes while the oven is heating up at 400 F / 200 C.
Heat the butter with the garlic in a small pan until melted. Add the parsley. Brush knots lightly with butter, avoid the parsley as best you can at this point because it might burn.
Bake for about 13 – 15 minutes. Remove from the oven and brush with more garlic butter.

Serve and enjoy.
Myra XO

pesto bread knots