Category Archives: Baking

Pumpkin Cheesecake bars with caramelized Pecans

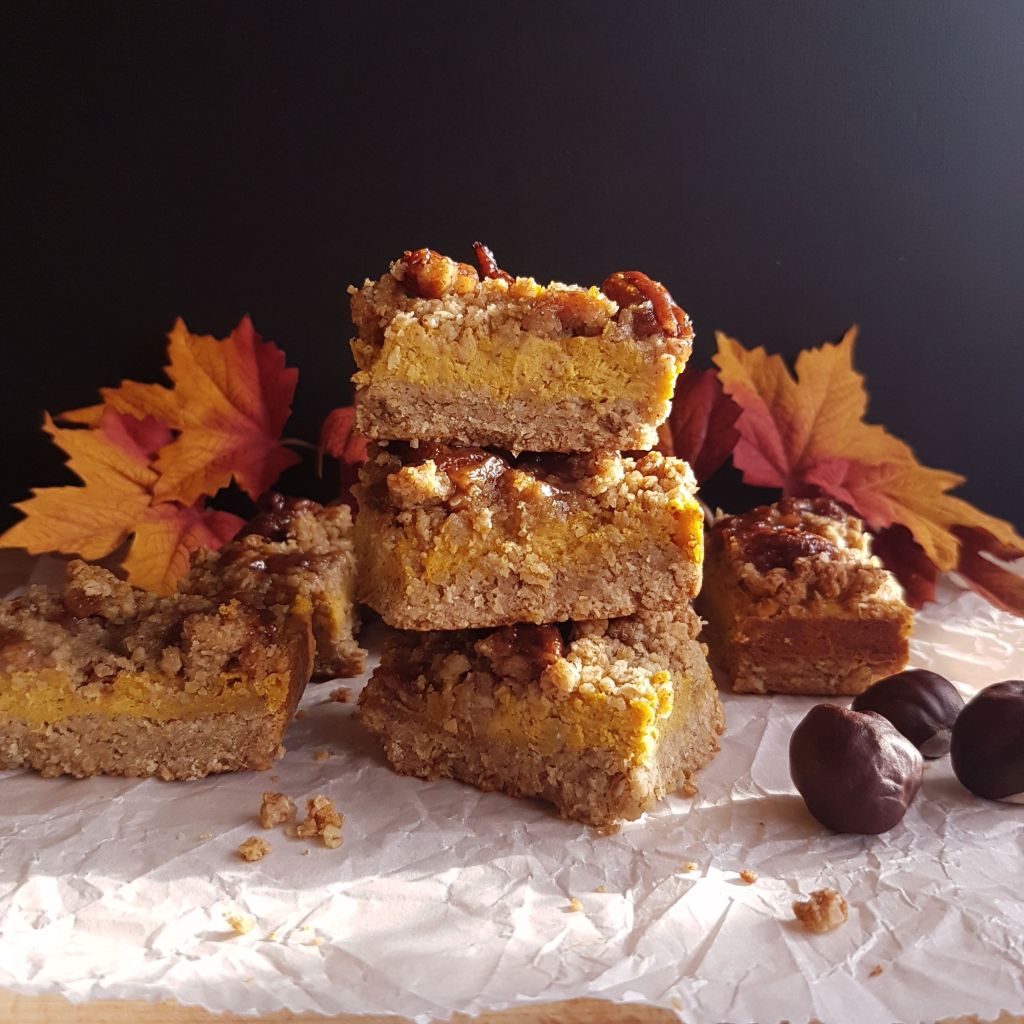
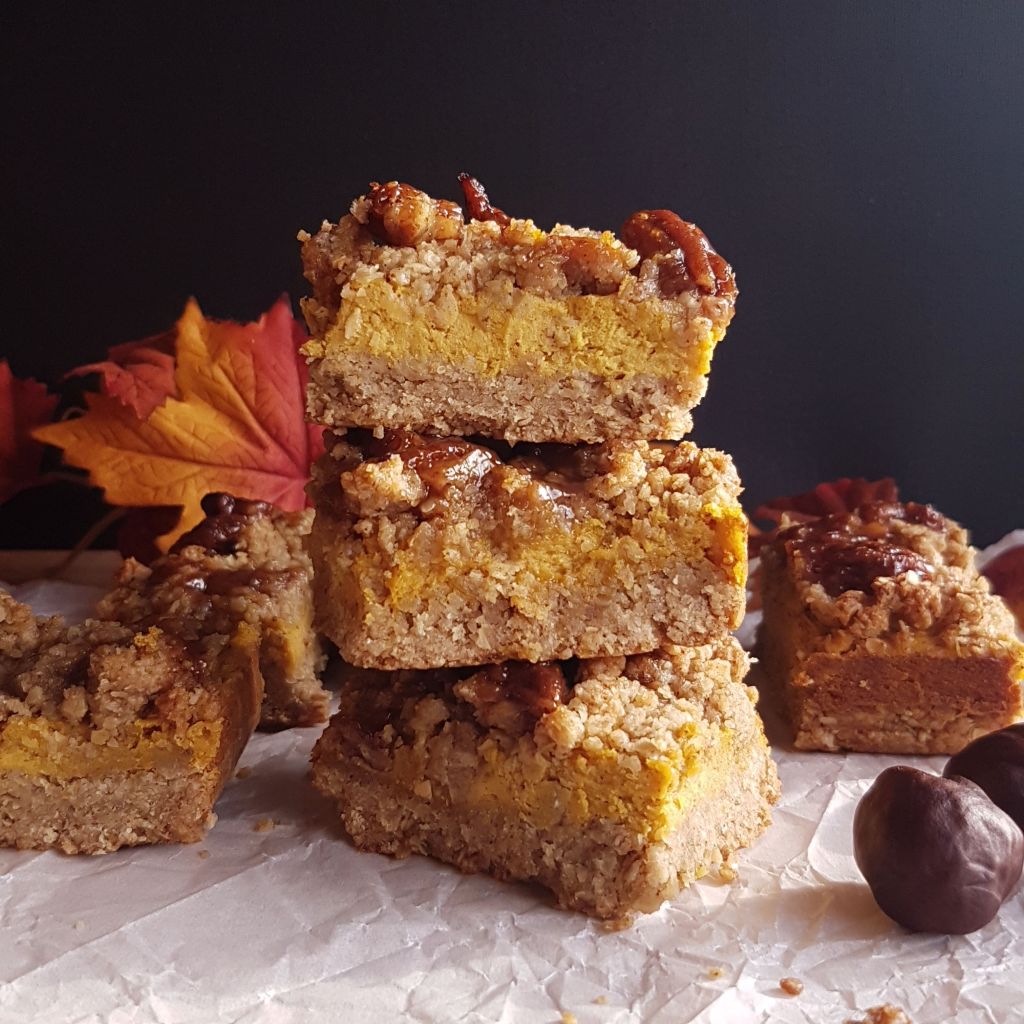
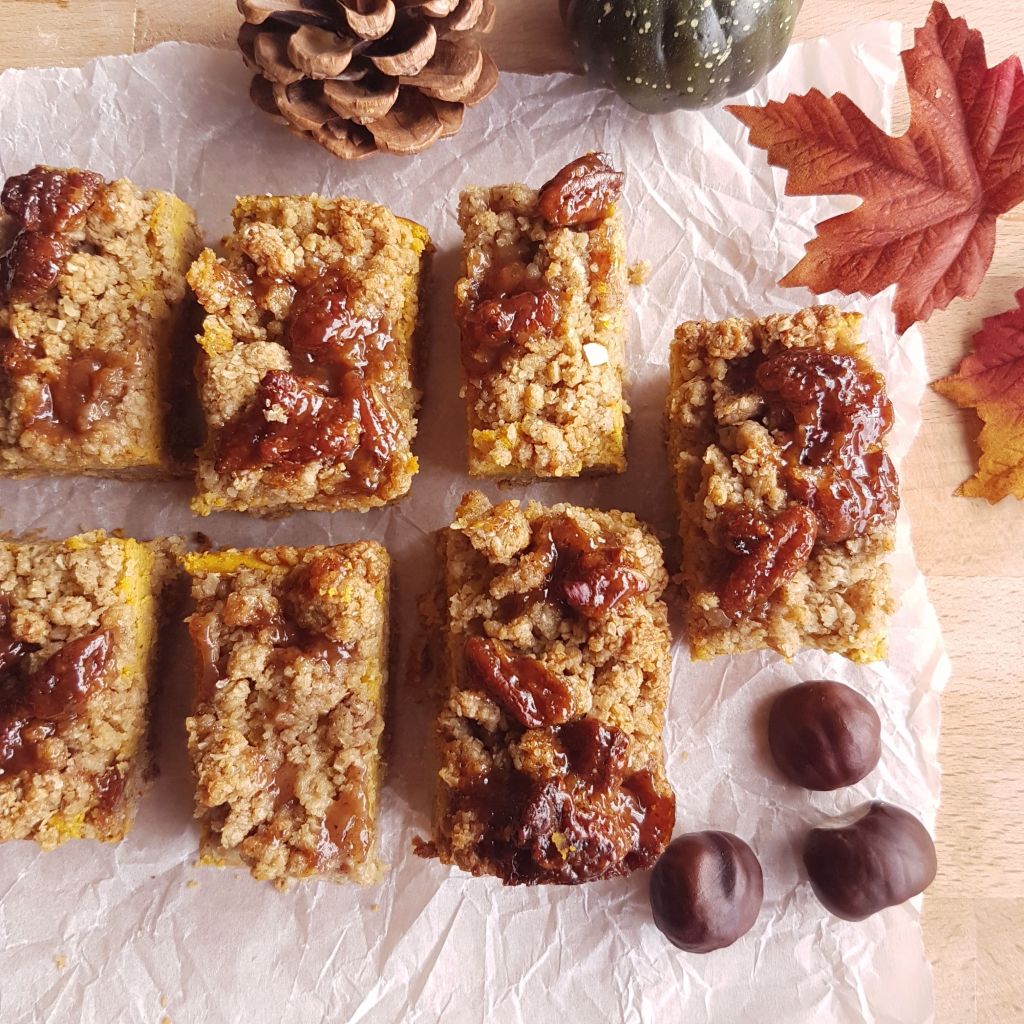
This Fall it’s all about Pumpkin cheesecake bars, these are the perfect mix of a pumpkin pie and a cheesecake, conveniently portioned into individual bars.

All the cozy fall flavours are combined into this spiced cookie bottom pumpkin cheesecake delight. The crunchy caramelized pecans on top are so so good, they would make a perfect snack on their own. The caramel for the base and topping, is made out of nut butter, maple syrup, rice syrup and vanilla and turns into a delicious fudgy consistency when cooked together.

The cookie base is a mix of oats, nuts, pumpkin spice and the fudgy caramel. The filling is pumpkin puree and cheesecake with one egg yolk to bind and some more cozy spices. The perfect treat for Fall.

For the base and crumble topping.
Ingredients:
3 cups (300 gr) oats ground to flour with a pinch of salt
3/4 cup (180 ml) almond butter
1/4 cup (60 ml) neutral oil or butter
1/4 cup (60 ml) maple syrup
1/4 cup (60ml) rice syrup
1 tsp (5ml) vanilla extract
1/2 tsp. (2.5 gr) Pumpkin spice
1/4 cup (25 gr) pecans broken into pieces or very roughly chopped

For the Pumpkin cheesecake filling.
Ingredients:
1 cup (250 gr) pumpkin puree, home made or canned* (see note).
3/4 cup (200 gr) cream cheese at room temperature
1 tsp (5 ml) vanilla extract
1/2 tsp (2.5 gr) pumpkin spice
1 egg yolk at room temperature

Instructions:
Preheat the oven to 160C/ 325F
Place the oats in a food processor and blend until flour consistency. Tip into a large bowl.
In a medium thick bottomed pot,  melt the nut butter, the oil, the syrups, vanilla and spice until completely melted and smooth and just beginning to bubble.  It will resemble a bubbly fudge. Remove from heat. Reserve 1/4 cup of the syrup ( leave in the pot) and keep over very low heat to keep it soft.
Pour the remaining fudgy caramel over the oat flour and mix until crumbly.  Reserve about a cup for the crumbly topping.

Grease and line a square 8″ (20×20 cm) pan with parchment paper. Tip in the crumbly oat base and press into the tin with the back of a spoon or with slightly damp hands. Pierce several times with s fork. Place on the middle rack in the oven and bake for 10 minutes.

Meanwhile mix the creamcheese in a mixer with the pumpkin puree,  spice and egg yolk until smooth.

*Note: depending on which kind of pumpking puree you are using, place puree in a tea towel lined collander for 30 minutes. Then gather the tea towel and squeeze out as much liquid from the pumpkin mash as possible. Some canned pumpkin is already quite dry so you will not need to do this, however homemade puree can often be a bit wet.

Tip the pecans into the soft fudgy  caramel and stir to coat. Keep slightly warm until ready to use or it will set.

After ten minutes remove the base from the oven, turn the heat of the oven up to 180C/350F.
Spread filling over the base and sprinkle over the crumble for the topping.
Then drizzle over the caramel pecans (the best you can because it’s very sticky and gooey).
Return to oven for another 12-15 minutes or until top is golden perfection.
Remove from oven and place on rack to cool.
Leave to cool for a few hours before cutting into bars.

Enjoy!

Blueberry Cobbler with almond yoghurt biscuit topping.

This is the perfect comfort dessert that’s easy to make and everyone will enjoy.
With just a few simple ingredients and a little effort, you’ll have a flakey, crispy-on-top, juicy-in-the-middle blueberry cobbler on the table in no time. I have added almond flour to the biscuit topping and also yoghurt, this makes the biscuits nice and fluffy, flakey and a little crispy at the same time but without being too hard, so it’s still scoopable.

I really  recommend putting this blueberry cobbler on your to-do list, you’ll love it.

Prep time : 15 min
Cooking time : 45 min
Serves : 6

INGREDIENTS:

FOR THE FILLING

• 800 gr / 5 ½ cups frozen blueberries
• ½ cup sugar
• 1 tablespoon cornstarch
• Pinch ground cinnamon

FOR THE TOPPING
• 3/4 cup all-purpose flour
• ¼ cup almond flour
• ½ cup granulated sugar
• 1 teaspoons baking powder
• ½ tsp. baking soda
• Pinch of salt
• ¼ cup yoghurt
• 2 tbsp. milk
• ¼ cup unsalted butter, melted
• 1 tsp. vanilla extract
• 1 tbsp. granulated sugar (for sprinkling)

DIRECTIONS:

1. Preheat oven to 180C/375F degrees.
2. Making the Filling: Whisk the sugar, cornstarch, cinnamon together in a large bowl. Add the blueberries and mix gently until evenly coated. Transfer the berry mixture to a 10-inch cast iron skillet or a square baking dish
3. To make the topping, mix the flour, almond flour, sugar, baking powder, baking soda and salt together in a large bowl. In a separate jug mix the melted butter, yoghurt, milk and vanilla. Add the wet ingredients to the dry and stir until just combined.
4. Scoop the dough into 8 or 9 pieces and place on top of the filling, evenly spaced (they should not be touching). Sprinkle evenly with the sugar.
5. Bake until the filling is bubbling and the top is golden brown and cooked through, about 40 to 45 minutes, rotating the pan halfway through baking. Transfer the pan to a wire rack and let cool for at least 20 minutes; serve warm or at room temperature with some vanilla ice-cream.

Enjoy!

If you make this Bluebberry Cobbler be sure to leave a comment! I’d love to hear from you and if you love it, pin it. And of course, if you do make this recipe, don’t forget to tag me on Instagram! @thecookingspoonblog or hashtag it #thecookingspoonblog

Gluten free Brownies

Brownies are probably the most comforting dessert I can think of and what’s even more comforting is how easy and uncomplicated they are.
I served these at my last minute birthday party and they were gone in ten minutes,  no joke.
(I was hoping for leftovers,  but not a chance)
The gluten free flour blend is home made but I imagine this Gluten free Brownies recipe will work with store bought gluten free flour as well. Below is my own flour mix which doesn’t contain xanthan gum or guar gum.

INGREDIENTS:

200 gr butter
200 gr dark chocolate
3 eggs
1 tbsp vanilla
1 tsp instant coffee
200 gr rice syrup
115 gr gluten free flour blend *see note
40 gr cocoa
3/4 tsp baking soda
1/4 tsp salt
1/4 – 1/2 cup chocolate chips (optional)

INSTRUCTIONS:

Line a baking tin of 20 x 20 cm approximately with parchment paper and spray with oil or pam.
Pre heat oven to 180C/350 F.
Melt butter and chocolate in a non stick saucepan on low heat until smooth stirring with a rubber spatula, add the coffee and vanilla and set aside to cool.
Meanwhile in a large bowl mix together the flour, cocoa, salt and baking soda, whisk to combine.
Once the chocolate has cooled,  stir in the rice syrup.  In a large bowl whisk the eggs and add the melted chocolate slowly and mix to combine well.
Stir in the flour and mix with rubber spatula until combined. 
Add the chocolate chips if using and pour in to baking pan.
Place in the middle of the oven and bake for about 25 to 30 minutes. It should still a a bit of a wobble in the center when you tap the baking tin.
Remove from oven and let cool completely before cutting into squares.
Enjoy!

GLUTEN FREE FLOUR BLEND
200 gr brown rice flour
200 gr white rice flour
100 gr corn flour
50 gr tapioca
4 tbsp. Psyllium husk powder
2 tbsp flax flour

Mix all these thoroughly and keep in a jar for all recipes like bread,  buns, pancakes and brownies.
Note that there is a lot of psyllium powder in here, this is to bind the flours during cooking instead of xanthan gum or  guar gum. You may need a little extra fluid in your recipe.

Pistachio Loaf Cake

When you are looking for a delicious loaf cake with an unctuous texture that’s even better the next day. This is the cake for you.
Pistachios are my favourite nuts so I wanted to create a loaf cake with an intense Pistachio flavor and a hint of spice.

Pistacious give the loaf cake a buttery nutty flavour, the hint of cardamom adds just a little bit of warmth. The lemon juice in the icing  adds just enough “zing” to balance it all out.  .

Adding olive oil ensure that the cake stays nice and moist and it will keep for 4 days but I can assure you it will not last that long. 

This is the perfect cake to make in the weekend to have with tea or coffee and even as breakfast

For this recipe I used unsalted (shelled) pistachios and placed them in a blender and blitz them a few times until fine crumbs, like almond flour consistency.  Don’t over grind the pistachios because you might end up with pistachio butter. 

INGREDIENTS:

Dry:
1 3/4 cup all purpose flour
1/4 cup almond flour
1 cup pistachios shelled then ground to flour
3/4 cup sugar
1 tsp. baking powder
1/2 tsp. baking soda
1/4 tsp. kitchen salt
1 1/2 tsp cardamom

Wet:
2 large eggs at room temperature
1/2 cup mild flavour olive oil
1/2 cup natural unsweetened yogurt
2 tbsp. milk
2 tsp. vanilla extract

Glaze:
1/4 c icing sugar
2 tsp lemon juice or water

Optional: edible rose petals or other flowers.

INSTRUCTIONS:


Pre heat the oven to 180C/350F.  Line a loaf tin with parchment paper. 
In a large bowl add the dry ingredients and stir well to combine.  Add the wet ingredients to a jug and beat together.  Pour the wet ingredients into the bowl with the dry ingredients. Stir to combine.
Pour the batter into the tin.
Tap the tin a few times on the kitchen counter to remove any air bubbles.
Place on the middle rack of the oven and bake for 50 minutes or until a skewer inserted in the middle comes out just dry. 
Remove from the oven and let cool completely before icing.
To make the icing, combine icing sugar with lemon juice and mix until smooth.
Pour over cake in zig-zag pattern and sprinkle with dry (edible) rose petals. The rose petals are optional but look beautiful and also taste great with the pistachios.
Enjoy!