Category Archives: Holidays

Strawberry Cloud Cheesecake

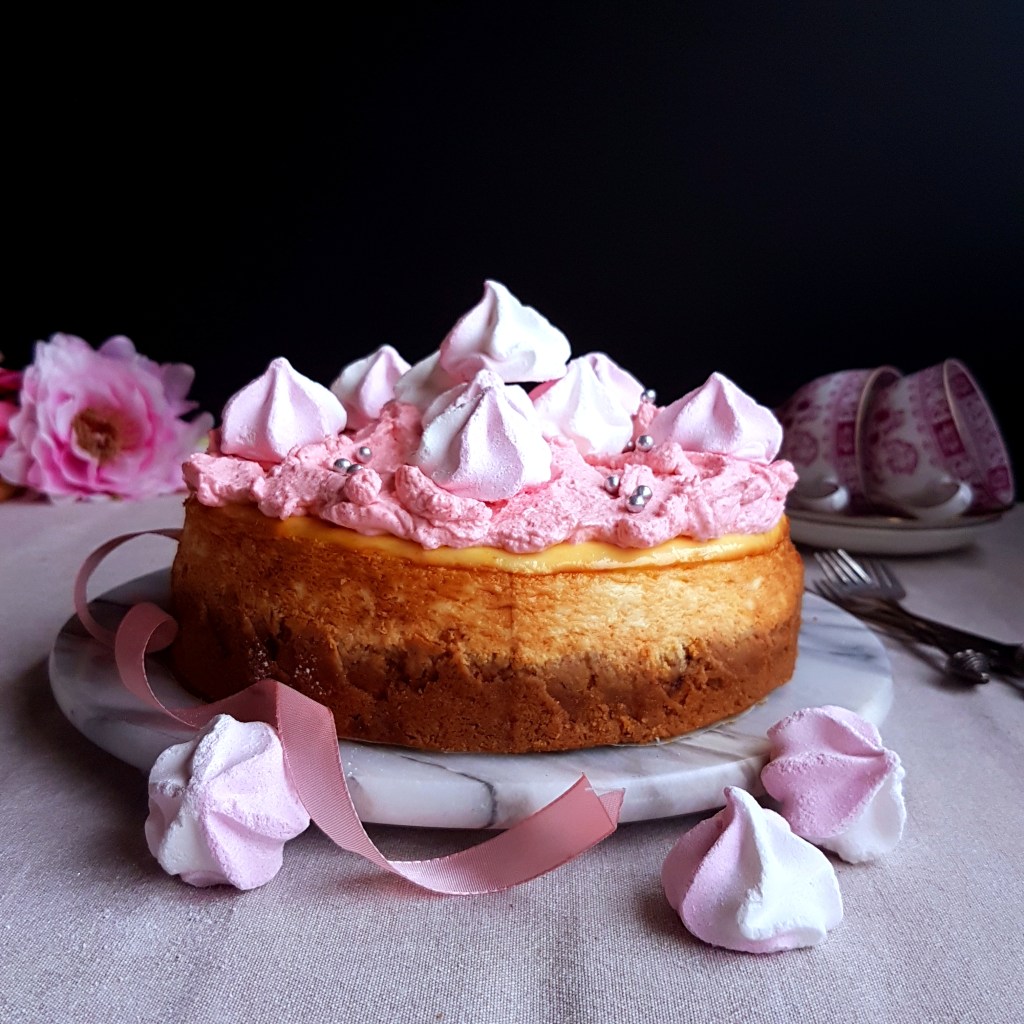
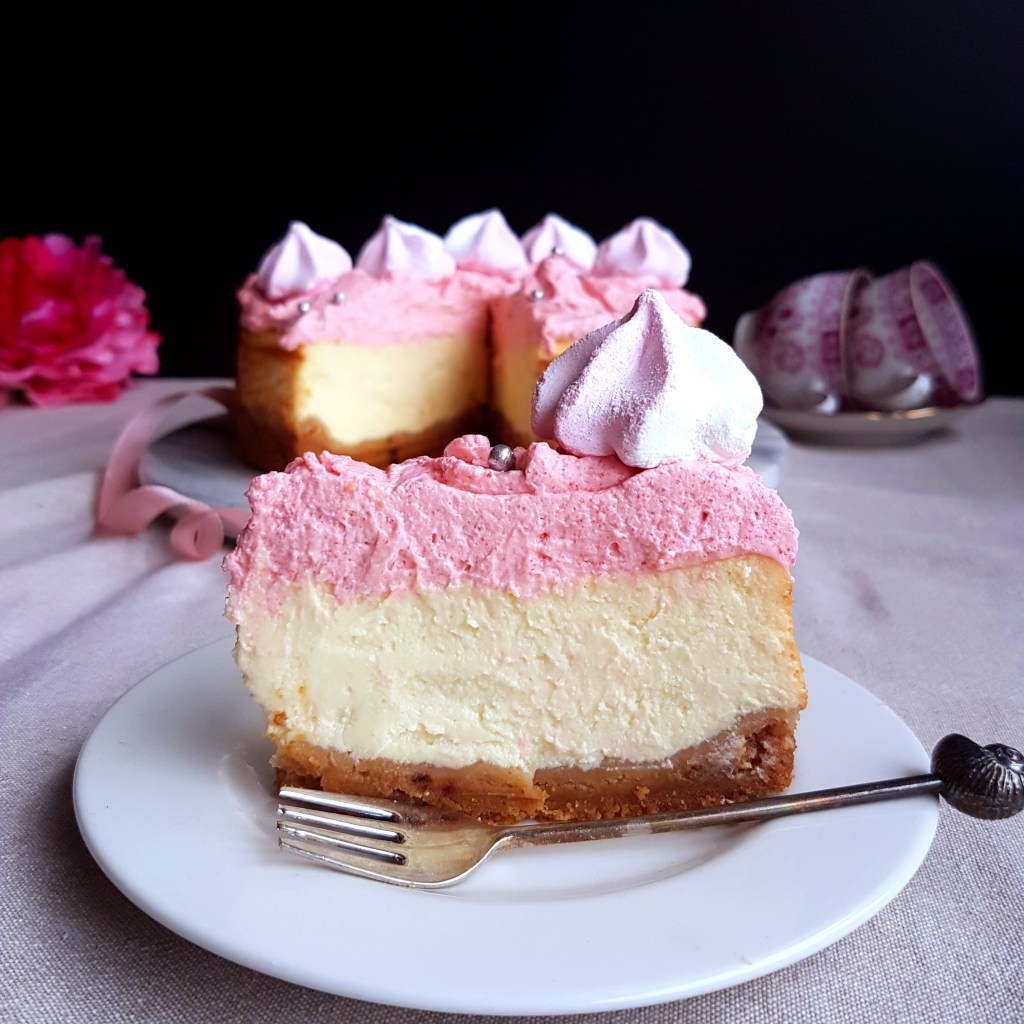
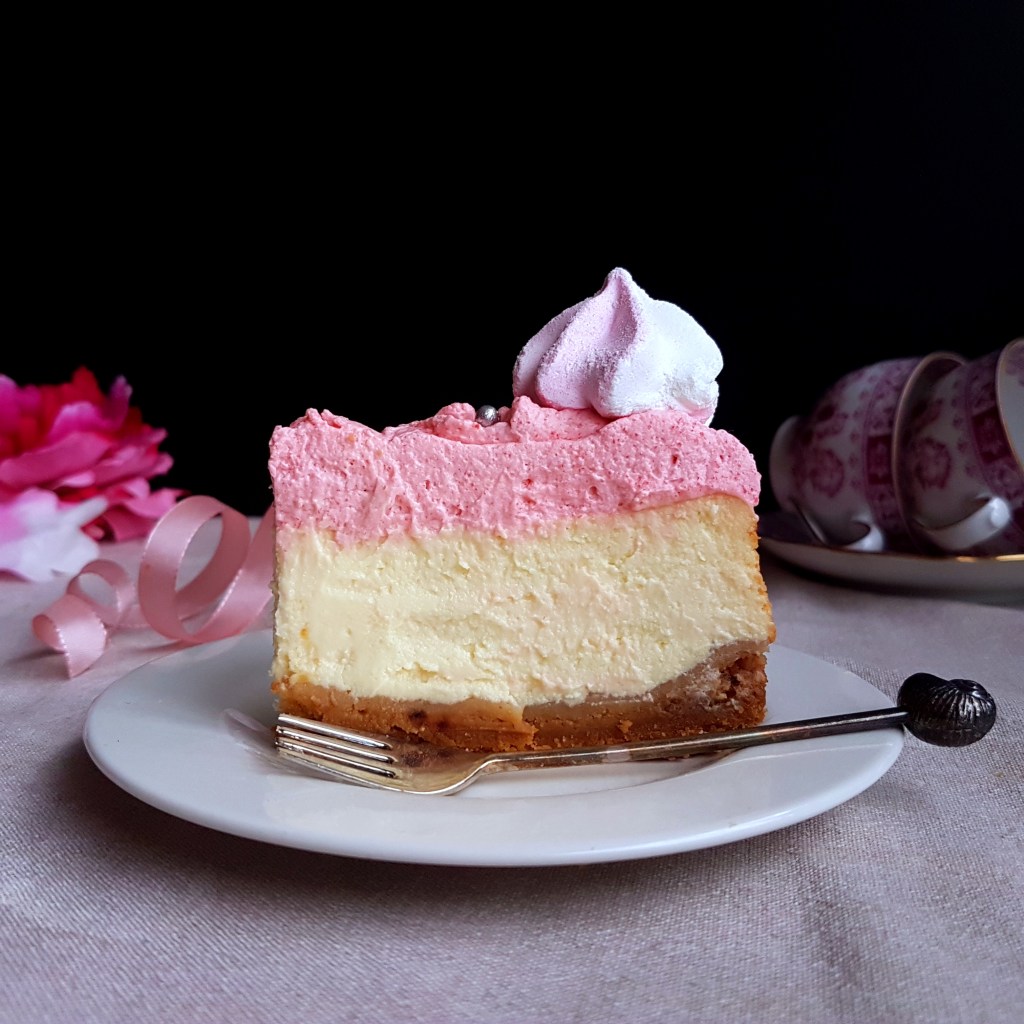
A fluffy cloud like Strawberry mousse sits atop this luscious creamy Vanilla Cheesecake.

The BEST part is, it’s a 2 Ingredient Mousse. It also happens to be ridiculously easy. Normally I’m not someone to use an instant pack of anything but I happened to get a few packs of Jello thru a promotion, and I have to say the flavour was surprisingly delicious and my goodness, how easy. And sometimes it’s ok the take a shortcut…

The Cheesecake is a basic Vanilla Cheesecake to which I have added some Greek Yogurt, this adds a nice tanginess to balance out the sweetness.

So…back to the Strawberry Mousse, if you mix instant Jello with heavy cream, you wonโ€™t believe the awesomeness it creates! Itโ€™s like a fluffy cloud of soft mousse made in 1 minute!

I made this Cheesecake recipe with Valentineโ€™s Day in mind, but you could make it anytime youโ€™re in the mood for a decadent Strawberry dessert.

Prep time : 20 min.

Cooking time : 60 min.

Serves : 6


Ingredients mousse:

2 tbsp. Strawberry Jello
1 cup whipping cream

Ingredients vanilla cheesecake:

  • 250 grs / 9 oz. cookies for crust
  • 100 gr. / 1/2 cup melted butter
  • 700 gr. / 3 cups+1 tbsp. cream cheese at room temperature
  • 100 gr. / 3.5 oz. full fat Greek Yoghurt
  • 3/4 cup sugar
  • 1 tbsp. vanilla
  • 1 tbsp. cornstarch
  • 3 large eggs
  • Meringue kisses to decorate (optional)

Instructions:

1. Pre-heat oven to 160C/315F. Butter and line a 20cm/8″ loose-bottomed tin with baking parchment. Put the cookies in a plastic food bag. Flatten bag to remove excess air, then seal bag. Crush to crumbs using a rolling pin or alternatively blitz in a food processor. Transfer to a bowl, then pour over the melted butter. Mix thoroughly until the crumbs are completely coated. Tip them into the prepared tin and press firmly down into the base to create an even layer. Chill in the freezer while you make the filling.
2. In a large bowl or stand mixer beat cream cheese, yoghurt and sugar until combined and smooth, add the corn starch and vanilla and blend until well combined. Add eggs, 1 at a time, beating until blended after each addition. Pour into crust. Place on a baking sheet.
3. Place in the middle of the oven and bake for 45 to 50 minutes or until center is almost set. Turn off the oven and open the door just a tiny bit (I put a large wooden spoon in the opening or a folded tea towel), leave the cheesecake in the oven for another 30-60 minutes. This will prevent the cheesecake from cracking. Remove from oven and cool at room temperature until no longer warm to the touch. Then refrigerate for at least four hours but preferably overnight.

When you re ready to serve the Cheesecake make the Strawberry Cloud Topping by tipping one cup of whipping cream into a bowl. Start beating until it begins to thicken and add the two tablespoons of Strawberry Jello powder. Continue beating until cream is stiff and fluffy. Spread over the Vanilla Cheesecake and decorate if desired with meringue kisses.

Enjoy!

More Strawberry related goodies…

Tiramisu Cream Puff Christmas Tree

Ready to impress? A dramaticย towerย ofย cream puffsย filled with Tiramisu cream, held togetherย with melted chocolate. Then finally dusted with lots of confectioners sugar.

It is not as difficult as it looks, but it does require a few steps. I like to make the cream puffs the day before assembling to divide the work. You can also make the filling the day before, whatever works for you best.

Leftover cream puffs can be frozen for up to two months.

A stunning dessert for any special occasion!

INGREDIENTS:

Cream Puffs:

  • 1/2 cup milk
  • 1-1/3 cups water
  • 1 cup butter, cubed
  • 1/2 tsp. salt
  • 1-3/4 cups all-purpose flour
  • 4 large eggs, room temperature

FILLING:

  • 1 cup heavy cream
  • 1/4 cup sugar
  • 1-2 tsp instant coffee granules
  • 2 tsp instant gelatine powder
  • 1 recipe pastry cream, home made or store bought (about 2 cups)


GLAZE:

  • 1/3 cup butter, cubed
  • 4 ounces unsweetened chocolate, chopped
  • 1-1/2 teaspoons vanilla extract
  • 1 tsp. instant coffee granules
  • 3 to 6 tablespoons hot water
  • Additional confectioners’ sugar, optional

DIRECTIONS:

In a large saucepan, bring water, milk and butter to a boil. Add flour and salt all at once and stir until a smooth ball forms. Remove from the heat; let stand for 5 minutes to cool a little. Add eggs, 1 at a time, beating well after each addition. Continue beating until mixture is smooth and shiny. Place mixture in a piping bag fitted with a large nozzle and pipe puffs onto baking sheet, about the size of a ping pong ball. You can press the tip of the puffs down with a wet finger to make them nice and round. Bake at 200C / 400F for 25 minutes or until golden brown. Remove to wire racks. Cut a small slit in the side of each puff to allow steam to escape. Cool puffs.
For filling, Prepare creme patisserie, see below if making home made.

In a large bowl, beat cream until soft peaks form add sugar, coffee and intant gelatine powder beat until stiff. Fold in creme patisserie. Place filling in piping bag fitted with a pointed tip and pipe about 1 tablespoon into each puff.

For glaze, in a small saucepan, combine butter and chocolate. Cook and stir over low heat until melted. Remove from the heat. Using a whisk, stir in the confectioners’ sugar, vanilla and coffee granules and enough water to make desired consistency for dipping. Stir until smooth and no lumps appear.

To assemble tree: Dip the bottoms of the puffs into glaze to start building your tree. Start with four puffs in the middle and then form a circle around them That’s your first layer, now continue for the second layer by dipping puffs in chocolate and placing them on the first circle. Continue all the way up until you are at the top. Drizzle remaining glaze over the tree, dust with confectioners sugar just before serving.

Enjoy!

Creme Pattiserie:

  • 4 egg yolks
  • 1/4 cup caster sugar
  • 3 tbsp plain flour
  • 2 tsp cornflour
  • 1 1/4 cup milk

Method:

  • Beat the egg yolks and sugar for a few minutes until pale and slightly thickened.
  • Whisk in the flours.
  • Heat the milk in a saucepan until stating to boil.
  • Whisk the milk into the egg mix.
  • Put the whole lot back into the pan, stirring all the time until thick and boiling.
  • Take the pan off the heat – cover with cling-film to prevent a skin from forming.

Brined Roast Turkey breast with Blueberry gravy

This festive turkey breast recipe is a great alternative to a whole roast turkey. Perfect for smaller crowds either for Thanksgiving or Christmas Day.

The Turkey breast is brined in a flavorful liquid infusing the breast with flavor and seasoning it throughout all while tenderizing it to butter-soft and juicy texture. Then it’s roast until golden perfection and served with a blueberry gravy

The great thing is that carving is so easy since the roast is boneless. 

All you need now are roast potatoes and vegetables for a complete Thanksgiving or Christmas dinner that is stress free yet fit for a king.


Prep time : 10-15 min

Cooking time : 60 min

Serves : 6

INGREDIENTS:

Turkey breast, about 1.2 – 1.5 kg./2.5 -3 pounds
Two large onions, peeled and sliced thick.
A sprig of each rosemary and thyme
2 tbsp neutral flavored olive oil
3 tbsp butter

Brine:
2 liters water
4 tbsp salt
4 tbsp brown sugar
1 onion sliced
2 bay leaves
2 star anise
1 cinnamon stick
1 tsp oregano
1 tsp rosemary
1 tbsp peppercorns
1 tbsp all spice berries
4 cloves
1 tsp Chinese 5 spice

Blueberry Gravy
2 sjalottes, peeled and very finely chopped
1 rounded tbsp. flour
2 glasses/1 cup red wine
250 ml/ 1  cup good quality turkey or chicken stock
2-3 tbsp Blueberry jam

METHOD Turkey

Mix all the ingredients for the brine in a large sealable container.  Place the Turkey breast in the liquid and leave to marinate for 3 to 4 hours, or all day.
Preheat oven to 350 degrees F (175 degrees C).
Remove the breast from the brine and pat dry with kitchen paper.
Prepare a roasting tin. Grease generously with neutral flavored olive oil and add the onions in a layer to the tin, then the herbs and place the breast on top. Season with salt and pepper and spread all the butter over the Turkey breast.
Tent turkey breast loosely with aluminum foil.

Roast in the preheated oven for 1 hour; baste turkey breast with pan juices and remove foil.  Return to oven for about 3 more minutes and roast until the juices run clear and an instant-read meat thermometer inserted into the thickest part of the breast, reads 165 degrees F (65 degrees C). Let the turkey breast rest 10 to 15 minutes before serving.

METHOD Blueberry gravy.

Remove the turkey breast from the roasting tin. Remove the onions and herbs.

Heat the stock and wine in a small saucepan and keep ready for adding to the sauce we are making.
Place the tin over a gentle heat, and tilt the tin and spoon off the fat into a bowl using a tablespoon, leave about 2 tablespoons of fat, along with all the juices, in the tin. Turn up the heat to medium and add the chopped sjalotte, cook quickly and scrape all the crusty bits from the base , then add the flour and keep stirring.  When the flour is absorbed start adding the wine and stock a  little at a time, whisking  after each addition. This is easiest with a whisk. Once you have incorporated all the liquid, add the blueberry jam. Season to taste with salt and freshly ground pepper.  Adjust the thickness of the gravy to your liking by adding more or less stock. 

Slice the Turkey breast and serve straight away with roast potatoes and vegetables and the Blueberry gravy.

Enjoy!

If you make this recipe please be sure to leave a comment and/or give this recipe a rating! I love hearing from you.ย  And please donโ€™t forget to tag me on Instagram so I can see your creations!

Super simple Pastry Dough

Super simple Pastry Dough!


And when I say simple, I mean really simple and pretty much fool proof and no fail. This flaky pastry dough keeps amazing in the fridge for a few days and also in the freezer for about a month. We always have some in the freezer.
Sometimes I prepare various tins filled with dough, pop them in the freezer so I can make a pie or mini tarts at a moments notice.
What I love about this recipe is that you can use it for both sweet or savoury pies.
The most important thing with pastry is that it has to be, and stay as cold as possible at all times until it goes into the oven. When using ice water use as little as possible, a high fat content is essential in the butter you use, 80% preferably. Cut the butter in small cubes and place it in the freezer for 5 minutes while you set up your food processor and get everything ready.
After that it’s five minutes work and your done.

Prep time : 10 min

Cooling time : 2 x 30 min

Cooking time : 20 min

Serves : 8

1 x 20cm/8in spring form tin or 8 small tins


INGREDIENTS:

– 200 gr / 7 oz. cold butter
– 300 gr / 10 1/2 oz all purpose flour
– a pinch of salt
– about two tablespoon of ice cold water (maybe three)

INSTRUCTIONS:

1. Fill a glas with ice cubes and add water.
2. Cut your butter into small cubes, place them in a bowl a place this in the freezer while you get out your flour and food processor.
Measure the flour and place in the bowl of the food processor. Add all the butter, divided evenly over the flour. You want to process as little as possible and as quickly as possible.
Add the pinch of salt.
Pulse the food processor a few times until the mixture resembles sand, add the ice water one tablespoon at a time. Pulse again. To test, grab some pastry between your fingers and press together, as soon as it holds , it’s ready. Tip out on to a work surface and shape into a ball. Wrap in cling film and place in the refrigerator for at least 30 minutes before shaping.
When ready to use, roll out the pastry to desired shape, place in tin that has been oiled slightly, pierce the pastry with a fork and place a piece of parchment paper on top. Add some baking beans. Return to the refrigerator for another 30 minutes to cool completely before baking.
Bake for 15 minutes, then remove the parchment paper and baking beans and bake for for 5 more minutes.
Now they are ready to be filled with your favourite filling, sweet or savoury.
Enjoy!