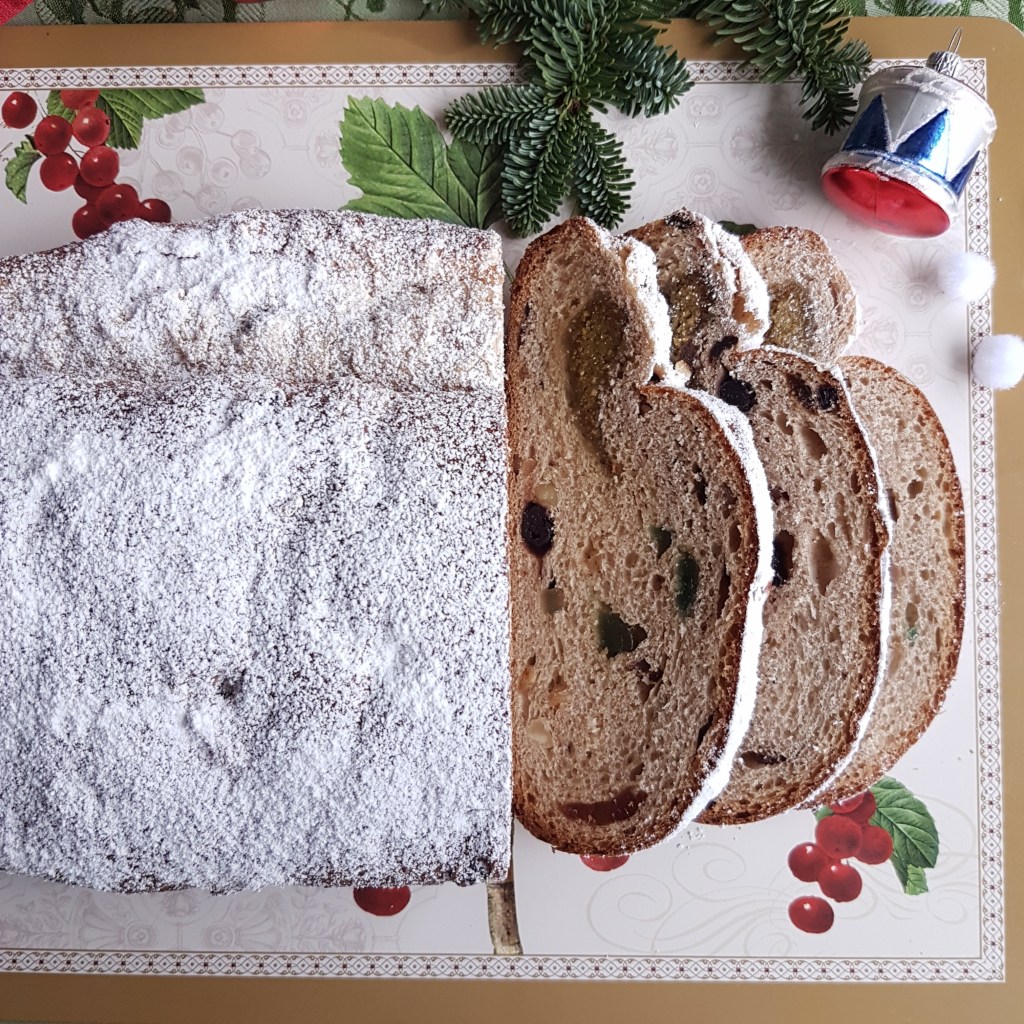
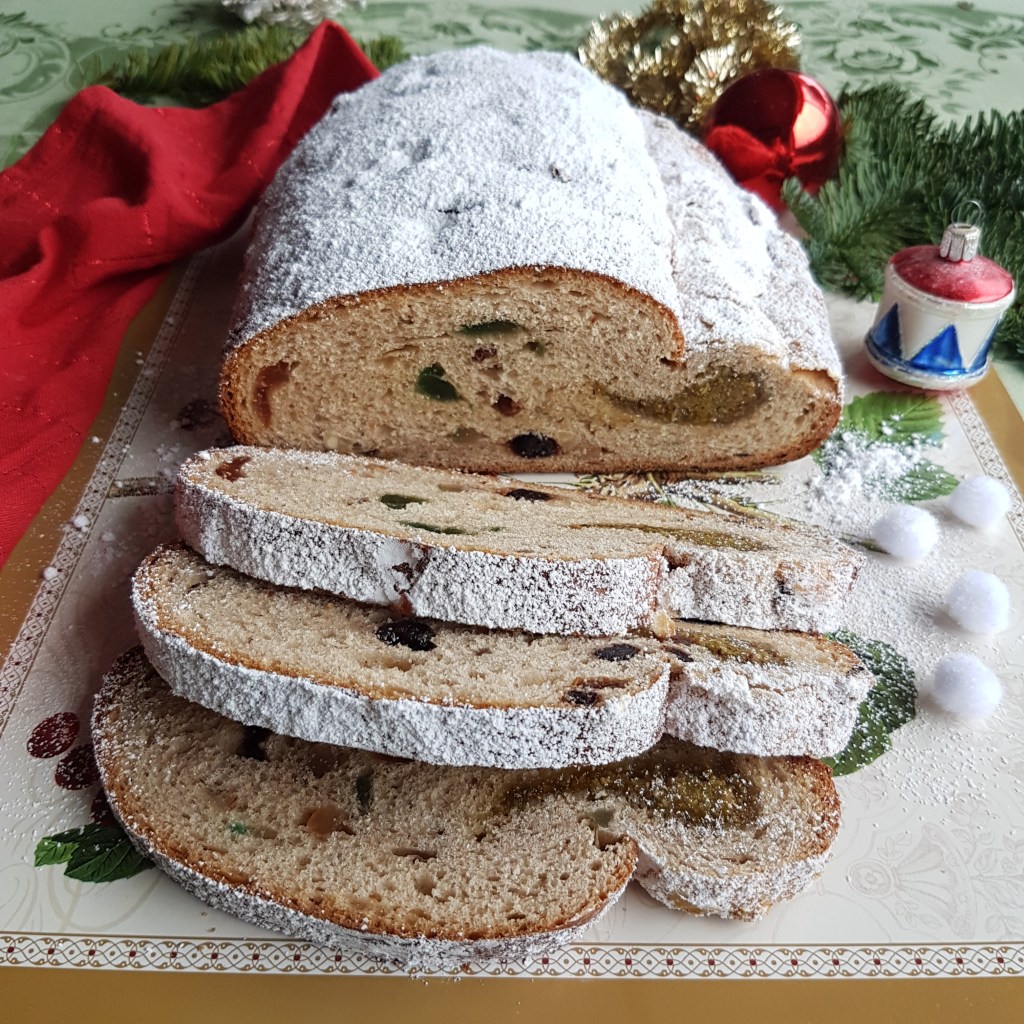
Tag Archives: Baking

Dutch Apple Pie

It doesn’t get anymore Dutch than Apple pie!
Apple pie is served at every occasion in the Netherlands,  it’s available in every single cafe or restaurant and also every single supermarket.  And although these are ok, nothing beats home-made Dutch Apple pie.  This recipe has been in my family for generations and my grandmother’s apple pie is legendary. This is her recipe!
It’s very simple and that is the beauty of it. The best apples are Jonagold, they hold their shape and don’t loose too much moisture, also Braeburn, Elstar or Golden delicious are great and you can also use a mix of apples which is what I usually do.

INGREDIENTS:

  • 1 egg, beaten
  • 2 1/2 cups (320g) all-purpose flour, plus extra for rolling
  • Pinch of salt
  • 1/4 cup (60gr) fine sugar
  • 16 tablespoons (2 stick, 225g) chilled unsalted butter, cut into cubes
  • 2-3 tablespoons very cold water
  • 6 large apples approximately, 
  • 1/4 cup (60gr) fine sugar
  • 1 tsp. cinnamon
  • 1 tbsp. Cornstarch
  • 1/2 tsp. Vanilla extract

INSTRUCTIONS:

To make the dough, in a food processor, combine the flour, sugar, and salt. Pulse 3 or 4 times to blend. Add the cubed butter and half of the beaten egg (the other half is for brushing over the crust) and pulse again until the mixture resembles coarse crumbs.  Sprinkle the ice water over the mixture and pulse again until it just comes together when pressed.  Transfer to a sheet of plastic wrap, divide into two and shape into two disks. Wrap tightly and chill for an hour.
Remove the dough from the fridge and let stand for 10 minutes. 
Place one part of the dough between two sheets of parchment paper and roll out to an even thick large round big enough to cover the bottom and sides of an 8 inch / 20 cm cake tin. Flour the dough as needed slightly to prevent sticking. 
Line your tin with parchment paper then carefully transfer disk to tin, if it breaks its ok, just patch it up as you go. Make sure to line the sides evenly and all the way up. Place the pie tin in the fridge while you make the filling.

Pre heat oven to 160C/320F.
Make your filling by peeling and removing the core of your apples. Then cut into pieces of about 1/2″/1.5cm. Place in bowl and add the sugar, cinnamon, vanilla and corn starch. Toss to mix and add the your pastry lined tin.
Roll out the second disk to a thickness of approximately 1/4″/0.6 cm to make the pretty lattice for the top. Cut into strips and place on apple filling to make a lattice pattern making sure to gently press the ends of the strips to the dough 8n the tin.
Brush all the visible dough with the remaining beaten egg 
Transfer to the oven and bake for one hour.
Transfer to a rack and let cool for 15 minutes.
Cut into wedges and serve as is or with whipped cream or ice cream.
Enjoy.

Advertisement

Oatmeal banana breakfast muffins with cookie dough crumble

Where to start with these Oatmeal Banana breakfast muffins? They are the best, everyone in my family loves them and I can’t seem to bake them fast enough to keep up with the demand. 
As you know I love baked Oatmeal,  but at a certain point you want something else in the morning.  Something even easier, better and more delicious.  Also more suitable for warmer weather.

They are so simple to make, I blend the wet ingredients in the blender, then poor this over the dry ingredients in a large bowl,  give it a stir and scoop into lined muffin tins. Sprinkle with plenty of the topping and bake, that’s it.
The great thing about these Oatmeal banana breakfast muffins is that you can also make these well ahead of time and store them in the freezer. Just pop them in the microwave to re-heat for a bit before serving. I actually microwave them for one minute from frozen, and they are warm and yummy and taste like freshly baked.

I almost forgot to mention the topping, the best part of course. The topping tastes like cookie dough and forms big lumps, just the way I like it and once baked,  has a slight crunch too it. You’ll love it!
These  Oatmeal banana breakfast muffins are also the perfect treat for when that afternoon sweet tooth hits.

Oatmeal banana muffin

Makes 6 jumbo muffins or 8-10 smaller ones.

INGREDIENTS:

Dry:
1.5 c. oat flour
1 c. all purpose flour
2 tsp. baking powder
1/2 tsp. baking soda
1/4 c. chocolate chips
Pinch of salt
1 tsp. cinnamon
Wet:
1/2 c. Greek yogurt
1/4 cup natural oil
2 ripe bananas, peeled
2 large eggs at room temperature
2 tsp. vanilla extract
1 tsp. stevia extract or 2 tbsp. light brown sugar
2 tbsp. honey

Topping:

3 tbsp. light brown sugar
1/2 c. All purpose flour
2 tbsp.  Natural oil or cold butter

INSTRUCTIONS:

Pre-heat oven to 180C/350F.
In your blender, add all the wet ingredients and blitz until smooth.

Meanwhile add all the dry ingredients to a large bowl,  also the chocolate chips and give everything a good stir.

Pour the smooth batter from the blender over the dry ingredients and stir with a spatula until just combined.
Scoop into lined muffin tins, I use 6 large muffin tins or you can make 8-10 smaller ones. You have to adjust the baking time, see below.

Make the topping by adding all these ingredients to a smaller bowl, and stir to combine. You can use your fingers to crumble the dough. Place a good amount on top of each muffin.

Place the muffins on a rack in the middle of the oven and bake for 25 min for 6 jumbo muffins or 20 min for 8 medium muffins. But since every oven is different,  I advise you to always do the wooden skewer test, when inserted in the middle of the muffin, it should come out just dry, then they are done.

Enjoy!

Gluten-free Yeast-free Bread

This Gluten free and yeast free bread is nice and soft and has a lovely crispy crust.
Not only is it gluten free and yeast free, but it has one of my favourite ingredients in it….OATS!
Yes Oats, as an everyday “baked Oatmeal” eater, you can probably imagine how happy this bread makes me.
Since there’s no yeast, there is also no waiting for the bread to rise. The kneading is minimal, which I now do in the electric mixer, so while I enjoy my mid-morning coffee my bread is basically making and baking itself.

I believe the true magic ingredient in this bread to be the ground psyllium husk. It binds the bread beautifully and makes it so soft, and it has a substantial amount of beneficial fibre making it in my humble opinion the best bread ever! The original idea comes from Ela Vegan, and since reading her recipe for gluten free bread, I’ve done a fair amount of research about adding psyllium to bread recipes. And there seem to be many many people using psyllium in gluten free bread as a binder. So after testing and baking a few weeks, here is my version and we love it, simply because it’s so easy, quick, delicious and healthy.
I hope you agree, why not give it a try?


Prep time : 10 min
Cooking time : 60 min
Makes : 1 loaf

INGREDIENTS:

• 30 gr. Psyllium husk powder
• 425 ml. hand warm water
• ½ tsp. salt
• 1 tsp. regular vinegar
• 100 gr. (gluten free) Oat flour
• 150 gr. Brown rice flour
• 45 gr. White rice flour
• 45 gr. Tapioca
• 50 gr. Seeds of choice (sunflower seeds, hemp, sesame…)
• 2 tsp. Baking powder
• ½ tsp. Baking soda
• 1 egg,  beaten for brushing loaf

INSTRUCTIONS:
1. Pre heat the oven to 180 C. / 350 F.
2. In the bowl of your mixer add the water, salt and vinegar. Stir to combine and sprinkle the psyllium husk powder over the water. With the hook attachment in place, run the mixer for a minute or so until well combined. Let it sit for 10 minutes until a jelly forms.
3. In a large bowl combine the flours with baking powder, baking soda and seeds, set one tablespoon of seeds aside for sprinkling on top of the loaf. .
4. Turn the mixer on to the lowest setting and pour in the flour mixture.
5. Mix until combined. It will not turn into a normal dough ball like what you are used to, but instead remain more crumbled.
6. Transfer the dough onto a counter top that you have dusted lightly with tapioca flour, knead slightly and shape into a loaf. Brush with egg and sprinkle with the remaining seeds.
7. Place the loaf on a lined baking tin and place in the middle of the oven.
8. Bake for 60 minutes until golden on top. And when tapped with your fingers, it will sound hollow. Alternatively you may insert a wooden skewer, it should come out dry.
9. Remove from the oven once fully baked and let it cool completely before cutting.
10. This bread will keep well wrapped or in a Tupperware for a few days. You can also freeze this loaf.

Enjoy!

If you make this Gluten free and yeast free bread , be sure to leave a comment! I’d love to hear from you and if you love it, pin it. And of course, if you do make this recipe, don’t forget to tag me on Instagram! @thecookingspoonblog or hashtag it #thecookingspoonblog

Raspberry Chocolate Chunk Banana Bread

If you love Raspberries, you’re going to love this recipe. I’m a little obsessed with this bread at the moment and have been eating it every single day for the past two or three weeks, I can’t even remember, we just can’t get enough of it.

Dark chocolate chunks with sweet Raspberries are just the best combination ever. Put those two in a rich Banana bread batter and you are pretty much in Paradise.

I used freeze-dried Raspberries, because I happen to have them, but you can use fresh ones if you prefer. Frozen ones on the other hand will dye your bread pink.

I love dark chocolate, the darker the better but if you prefer a little sweeter chocolate, by all means use semi-sweet.

As for the bananas, use them very ripe, when they’re speckled with black dots.

I have used olive oil here, a very mild kind since I love the fruitiness it adds to the bread, perfect with the Raspberries.

INGREDIENTS:

  • 4 medium very ripe bananas, mashed (about 1 1/4 cup mashed)
  • 1/4 cup neutral olive oil
  • 1/4 cup Greek yogurt
  • 1/4 cup light brown sugar
  • 2 eggs
  • 3 tsp. vanilla extract
  • 1 cup whole wheat pastry flour,
  • 1 cup all-purpose flour
  • 1 tsp. baking powder
  • 1/2 tsp. baking soda
  • 1/2 tsp. ground cinnamon
  • 1/4 teaspoon salt
  • 1 cup dark chocolate chunks, or chopped chocolate
  • 1/2 cup freeze dried Raspberries or 1 cup fresh raspberries

METHOD:

Pre heat the oven to 180C/350F. Lightly oil a 9×5-inch/23x13cm loaf tin and line with baking paper.

Puree the bananas in a food processor, add the oil, yogurt, sugar, eggs and vanilla and mix until combined.

In a large bowl, mix the flours, baking powder, baking soda, cinnamon and salt.

Pour the wet ingredients over the dry ingredients and stir with a rubber spatula until combined. Stir in the chocolate chunks.

Add the (freeze-dried) Raspberries and stir until mixed thru, don’t over-mix. You want to keep the Raspberries whole.

Pour the batter into the prepared loaf pan and smooth the top with the spatula.
Bake in the middle of the oven for 50 to 60 minutes or until a wooden skewer inserted in the middle comes out dry(-ish). It is still supposed to be moist since it’s a banana bread, however there should not be any batter still sticking to the skewer.
Should the bread become too dark you can tent some foil over the top loosely.

Remove from oven once it is finished baking and let it cool on a rack for about 10 minutes, then remove from tin with the parchment paper and let cool completely before slicing.

Enjoy!