Author Archives: The Cooking spoon

Gluten free Brownies

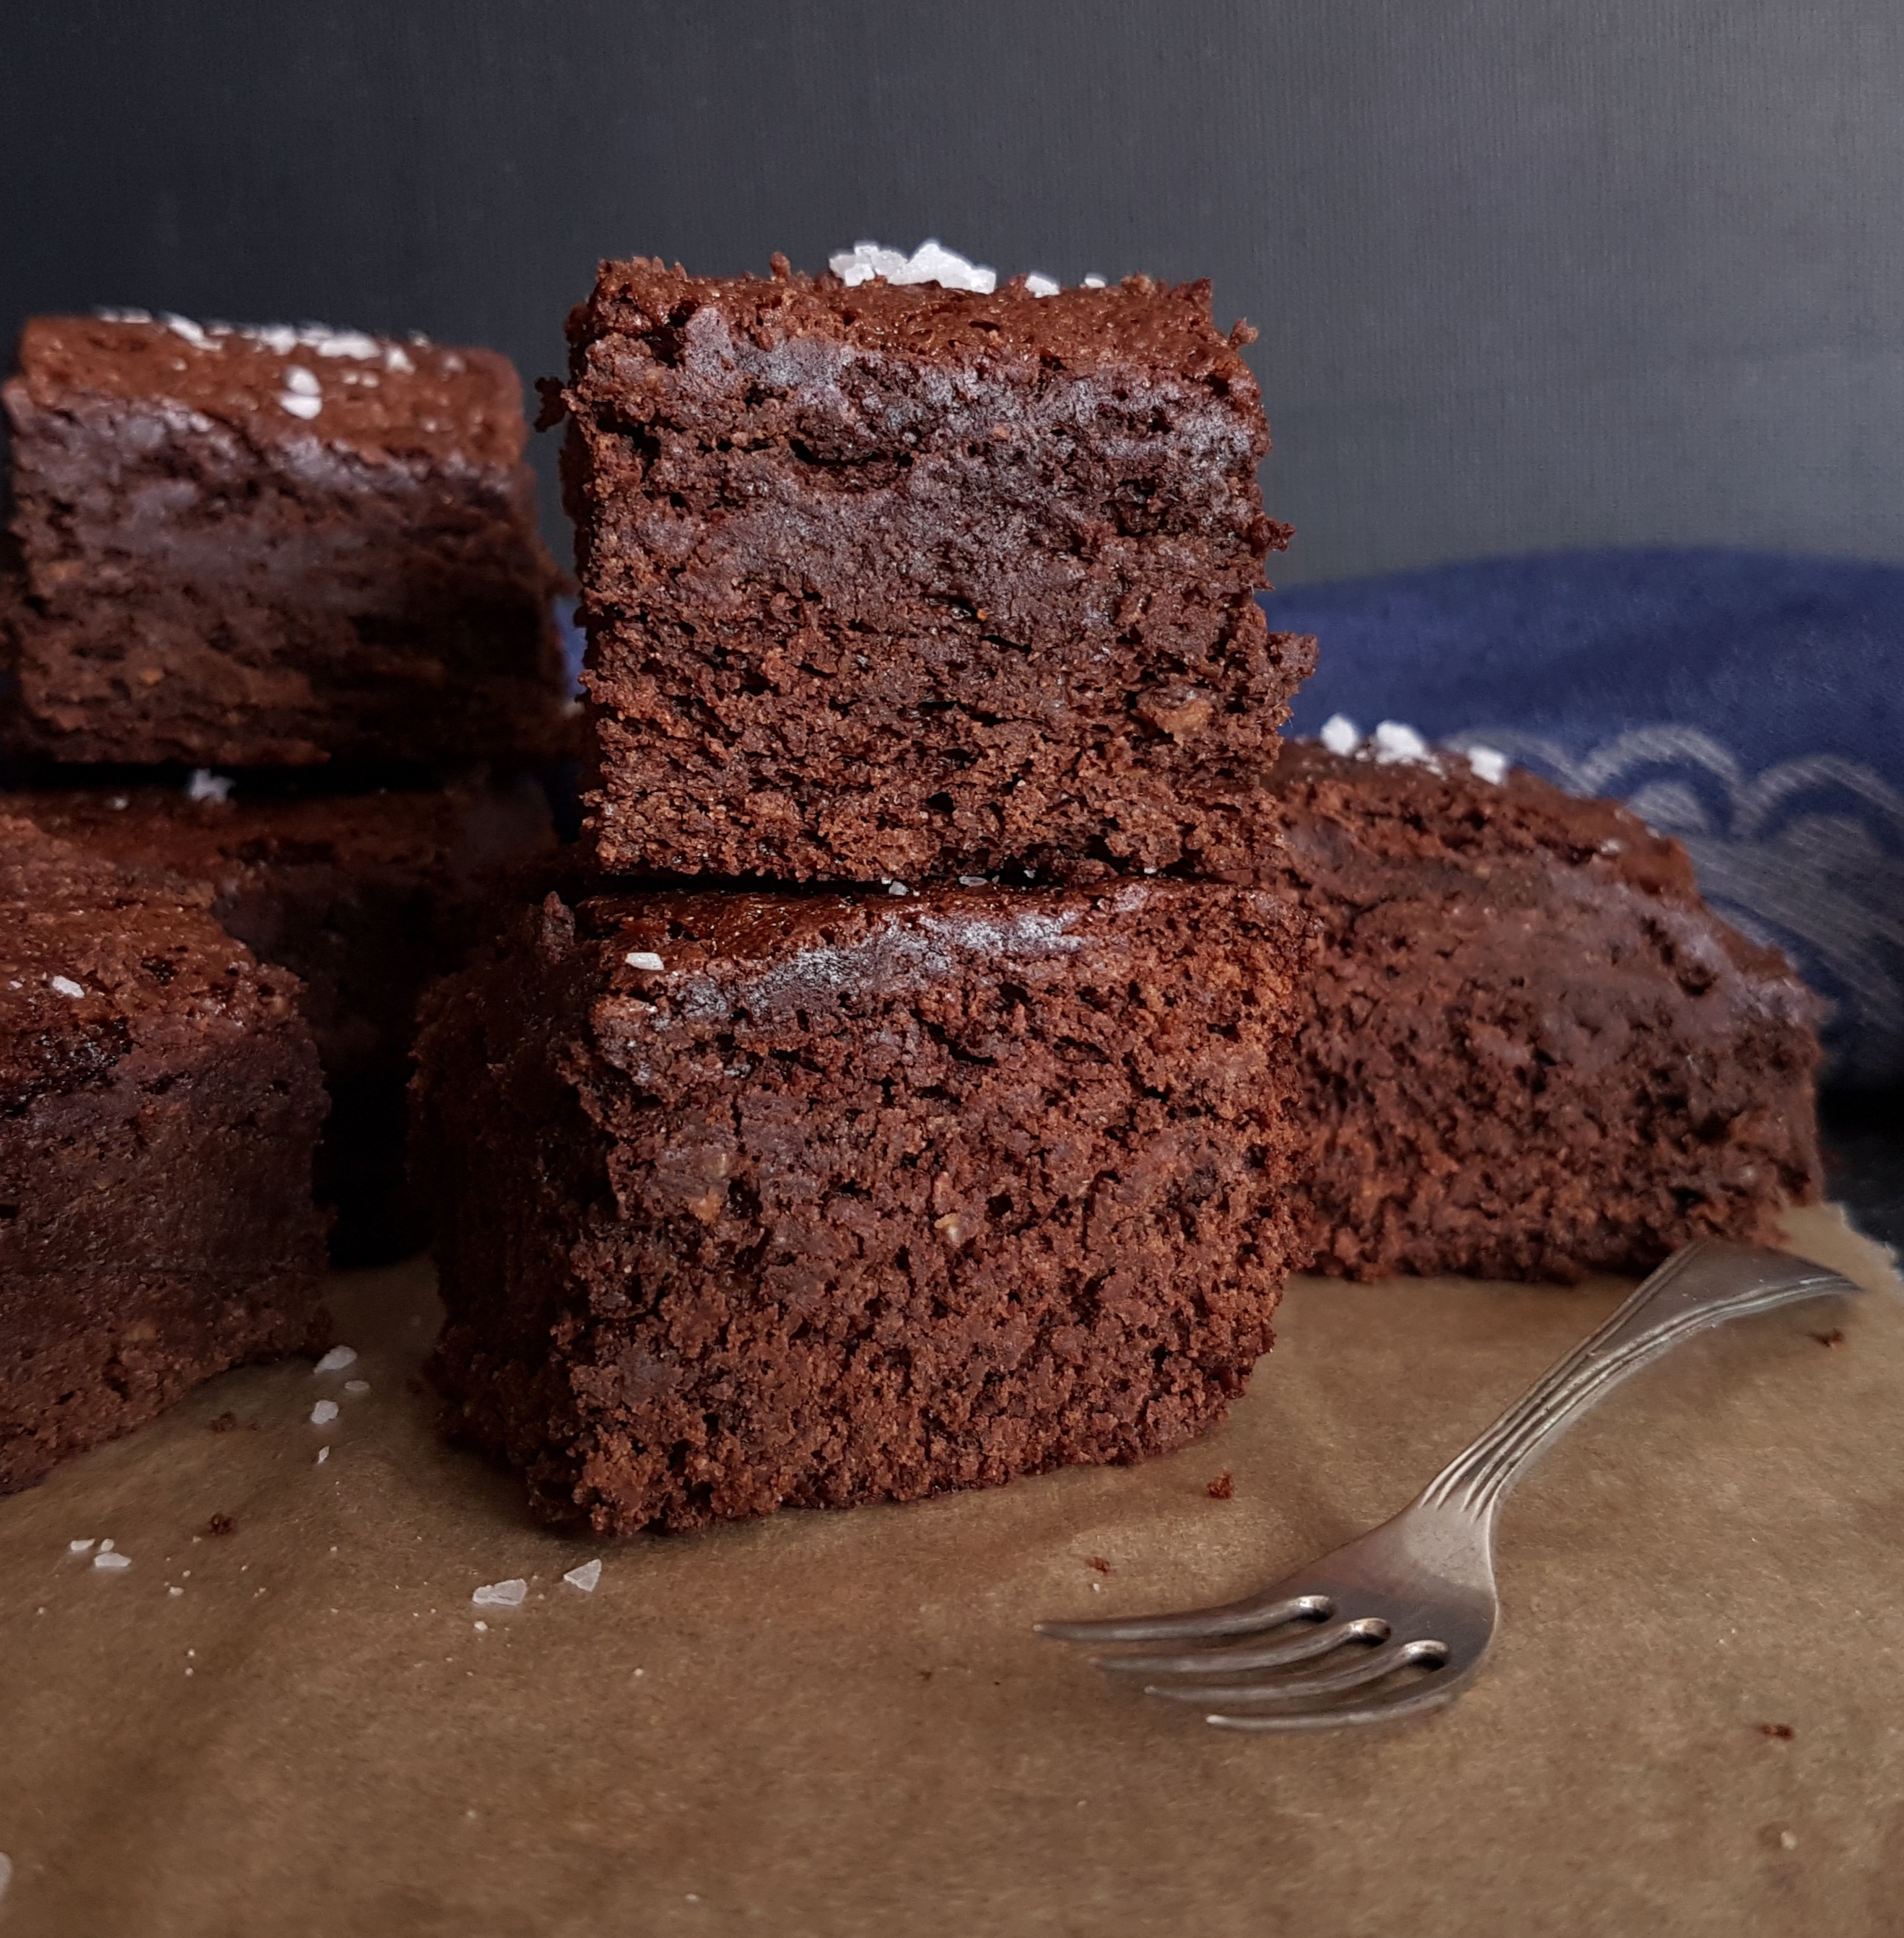
Brownies are probably the most comforting dessert I can think of and what’s even more comforting is how easy and uncomplicated they are.
I served these at my last minute birthday party and they were gone in ten minutes,  no joke.
(I was hoping for leftovers,  but not a chance)
The gluten free flour blend is home made but I imagine this Gluten free Brownies recipe will work with store bought gluten free flour as well. Below is my own flour mix which doesn’t contain xanthan gum or guar gum.

INGREDIENTS:

200 gr butter
200 gr dark chocolate
3 eggs
1 tbsp vanilla
1 tsp instant coffee
200 gr rice syrup
115 gr gluten free flour blend *see note
40 gr cocoa
3/4 tsp baking soda
1/4 tsp salt
1/4 – 1/2 cup chocolate chips (optional)

INSTRUCTIONS:

Line a baking tin of 20 x 20 cm approximately with parchment paper and spray with oil or pam.
Pre heat oven to 180C/350 F.
Melt butter and chocolate in a non stick saucepan on low heat until smooth stirring with a rubber spatula, add the coffee and vanilla and set aside to cool.
Meanwhile in a large bowl mix together the flour, cocoa, salt and baking soda, whisk to combine.
Once the chocolate has cooled,  stir in the rice syrup.  In a large bowl whisk the eggs and add the melted chocolate slowly and mix to combine well.
Stir in the flour and mix with rubber spatula until combined. 
Add the chocolate chips if using and pour in to baking pan.
Place in the middle of the oven and bake for about 25 to 30 minutes. It should still a a bit of a wobble in the center when you tap the baking tin.
Remove from oven and let cool completely before cutting into squares.
Enjoy!

GLUTEN FREE FLOUR BLEND
200 gr brown rice flour
200 gr white rice flour
100 gr corn flour
50 gr tapioca
4 tbsp. Psyllium husk powder
2 tbsp flax flour

Mix all these thoroughly and keep in a jar for all recipes like bread,  buns, pancakes and brownies.
Note that there is a lot of psyllium powder in here, this is to bind the flours during cooking instead of xanthan gum or  guar gum. You may need a little extra fluid in your recipe.

Peach Basil Shrimp Salad

Peach Basil Shrimp Salad with Sweet Chili Vinaigrette

Peach Basil Shrimp Salad

When the temperature rises, easy meal prep and (semi) cold dishes are my kind of meal! This Peach Basil Shrimp Salad tastes light and fresh! Tender crisp succulent grilled shrimp served on a bed of crispy greens with juicy Peaches and lots of Basil for a complete meal ready in minutes (with almost no clean up); this is truly the perfect summer meal!
And for that matter, our favourite Salad.
The dressing is made with ready sweet chili sauce and an ingredient that I really love, Ume Su. Maybe you have heard of it? I discovered it a couple of years ago and love it.

Ume Su is the red juice of umeboshi apricots that are put in brine with shiso leaves. Its also very salty, and most times it’s not necessary to add more salt to your recipe. Ume Su is less acidic than ordinary vinegar though, because it’s technically not a vinegar but the sour brine juice from the lactic acid fermentation.
The best way to describe the flavor is fruity, slightly acidic and salty all at the same time, that’s why I love adding it to sauces and vinaigrettes because it adds a lot of flavor and a little goes a long way.
If you can’t find it, buy it online, but if you don’t feel like buying it at all, which I totally understand (but you’re missing out on something great), sub with more vinegar and salt.

Peach Basil Shrimp Salad

Prep Time : 15 mins
Cook Time : 5 mins
Total Time : 20 mins

Servings: 4

Ingredients:

INGREDIENTS Sweet chilli vinaigrette
• 6 tbsp. sweet chilli sauce
• ½ cup natural oil or very light olive oil
• 1 tbsp. sesame seed oil
• ¼ cup lime juice
• 1 tbsp. fish sauce nam pla
• 2 tsp Ume Su
• 1 tbsp. honey
• Freshly ground black pepper
• Salt if necessary
INGREDIENTS Peach Basil Shrimp Salad:
• 1 cup loosely packed basil leafs only
• 16 oz. / 450 gr. mixed salad greens various colors if possible
• 1 cup radishes
• 2 peaches
• 2 avocados
• 5 spring onions
• 16 oz. / 450 gr. peeled big fresh shrimp
• 1 tbsp. canola oil
• Salt and pepper
• 1 large buffalo Mozzarella or 2 medium
• Handful fresh cilantro

Peach Basil Shrimp Salad

Peach Basil Shrimp Salad
Instructions:

1. For the Sweet Chilli Vinaigrette, mix all the ingredients in a jar and shake until well combined.
2. Reserve until ready to use. Leftovers are best stored in the fridge.
3. Place all the greens in a large serving dish. Sprinkle the Basil leafs on top of the greens.
4. Cut the radishes in very thin slices and fan them out, place them on the salad. Leave some of the smaller radishes whole.
5. Peel the peaches, cut in half, twist and separate the halves. Remove the stone and also cut into thinner wedges and place on the salad fanned out.
6. The same goes for the avocados, peel, cut in half, remove the stone and slice and place on salad.
7. Put a frying pan on medium high heat, when hot add the oil. Season the shrimp and cook for about two to three minutes on each side, depending on the thickness of the shrimp.
8. Cook until no longer pink and remove straight away from the heat. Arrange on the salad.
9. In the middle of the salad, place the buffalo mozzarella, slightly torn open to reveal it’s soft inside.
10. Sprinkle with the fresh cilantro and serve drizzled with the sweet chilli vinaigrette.

Enjoy!
Myra XO

Peach Basil Shrimp Salad

Strawberry Ice Cream Double Chocolate Chip Cookie Sandwiches (vegan)

These Strawberry Ice Cream Double Chocolate Chip Cookie Sandwiches are a great (weekend) project, fun to make and sooo delicious to eat. The kids will love helping you make them. You can assemble them completely ahead of time and keep them in the freezer, ready to eat at any time. The combination of chewy chocolate cookies and the fresh strawberry ice cream is the best ever. 


Prep time : Cookies, 15 minutes plus baking. Ice cream, 10 minutes plus freezing
Cooking time: 12 minutes
Makes : 6 (large) Sandwiches

INGREDIENTS STRAWBERRY ICE CREAM;

• 300 grs / 10.5 oz , about 1 1/2 cups (frozen )Strawberries, hulled
• 4 tbsp. Agave Syrup* or according to taste
• 1 tsp. Vanilla extract
• 1 tbsp. tapioca flour** (see notes)
• 1 cup Soy or Oat whipping cream

INSTRUCTIONS:

1. Freeze the strawberries the night before if you are using fresh ones.
2. Put the strawberries with the agave syrup, the tapioca and vanilla in a blender and blend until very smooth.
3. Whip the soy cream until stiff peaks form and fold the strawberries thru the whipped cream.
4. Place in an ice cream maker or in a container in the freezer. If you freeze it in a container you need to whip it after about two hours to avoid crystallization. Freeze preferably over night, but it should be frozen after about 4 to 6 hours depending on your freezer. 

DOUBLE CHOCOLATE CHIP COOKIES:
WET INGREDIENTS;
• 1 tbsp. ground flax plus 1 tsp. tapioca flour, plus 3 tbsp. water mixed
• 1/2 C. solid coconut oil/fat
• 3/4 C. coconut sugar
• 1 tsp. vanilla extract
DRY INGREDIENTS;
• 1 cup plus 2 tbsp. (gluten free) flour 
• 1/4 C. cocoa
• 1/2 tsp. baking soda
• 1/2 tsp. pink Himalaya salt
• 1/8 tsp. cinnamon
• 1/2 C. mini vegan chocolate chips

INSTRUCTIONS:
1. Start by soaking the flax/tapioca mix and let stand for about 10 minutes while you prepare the rest.
2. Mix all the dry ingredients in a bowl and whisk to combine.
3. In an other bowl, mix the wet ingredients and combine with the dry.
4. At this point I like to place the cookie dough on a piece of parchment paper and roll it into a cylinder.
5. Then I place it in the refrigerator for at least two hours or if you are in a hurry in the freezer for half an hour.
6. This will give you the perfect cookie consistency when baking. They dough needs to be really cold!!!
7. Then when you’re ready to bake, pre heat the oven to 175° C / 350° F
8. Shape dough into balls and press them a little flat with your hand. Lay them onto the baking sheet lined with parchment paper.
9. Bake for 12 minutes.
10. The cookies may look a little soft still but they will continue to cook on the baking sheet as thy cool. 
11. When you take them out of the oven, immediately press on a few more chocolate chips, for prettiness. And because it’s so darn delicious!
12. Let cool completely. I keep mine in the refrigerator because I love how they become chewy.
13. To make the ice cream sandwich, take two cookies. Scoop out one big ball of strawberry ice cream***(see notes) and place it on one cookie. Gently press down with a spoon first and then place the second cookie on top being careful not to break.
14. Press the sandwiches in some sprinkles if you like.

Notes: 

*). Syrup keeps ice cream softer in the freezer and prevents it from becoming too hard.

**). Seeing tapioca as an ice cream ingredient may seem odd  at first, but it actually makes the ice cream so much creamier and velvety.

***). I scooped the ice cream balls ahead of time and placed them in a container and back into the freezer until I was ready to “build” the sandwiches.

Enjoy!

One pot Summer Quinoa salad, Tahini-Orange dressing.

A quick Summer Salad that is made all in one pot. It can be served straight away (aka warm),  at room temperature,  or cold. We like it best cold, but that’s completely up to you of course.
I mean, what’s not to love about a salad that can be made all in one pot right?
You start by heating some olive oil in a large pot and cook some onion, garlic and veggies. Then you add the Quinoa,  add the rest of the ingredients and like magic,  15 minutes later you have the best Summer Quinoa salad of your life. Perfect for lunch or dinner over a bed of some greens, or as a side.
The Tahini Orange dressing takes the recipe to a whole new level 
Before you know it,  you’ll be making this one pot Summer Quinoa Salad, all Summer long.

INGREDIENTS:


2 tablespoons olive oil
1 medium chopped onion
1 medium carrot,  peeled and chopped
1 cellery stalk, chopped
1 garlic clove,  peeled and chopped
1 medium red bell pepper, chopped
1 medium tomato, green top removed,  chopped
1 cup uncooked quinoa
2 cups hot vegetable or chicken stock
1/2 cup chickpeas from can, drained
1/2 cup frozen peas
1/2 cup fresh corn, removed from ear or frozen

Tahini Orange Dressing:
¼ cup olive oil
¼ cup orange juice, about one
Juice from half a lemon
1 heaped tablespoon tahini
1 cloves garlic, pressed or minced
1 tablespoon maple syrup or honey
2 teaspoons Coconut aminos
½ teaspoon fine sea salt
Freshly ground black pepper
A dash or two of franks hot sauce

1/2 cup flat-leaf parsley, chopped
1/2 cup basil leafs, torn or chopped
1/2 cup chopped pistachios
Chili flakes
Extra orange or lemon wedges for serving

INSTRUCTIONS:


Place a medium pot over medium heat. Add two tablespoons of olive oil,  add onion and cook until glossy, about 4 minutes. Add the remaining vegetables in the order mentioned above stirring while doing so.  Carrot, cellery, garlic,  bell pepper and the tomato. Season with salt and pepper. Stir for two minutes and then add the quinoa,  give it a stir and combine well with all the vegetables in the pan.
Now add the hot stock, bring to a simmer. Lower the heat to medium-low, cover and cook for 13 minutes. Turn off the heat and let rest uncovered for 5 minutes. Tip the Quinoa into a large serving dish.  Add the fresh herbs and carefully spoon thru to combine.
Sprinkle with the chopped pistachios and decorate with orange or lemon wedges if desired. Serve with the Tahini Orange dressing .
To make the Tahini orange dressing,  simply combine all the ingredients in a small jar and shake to mix.  This dressing is delicious on all sorts of salads,  so I advise you to bookmark it. Enjoy!