Category Archives: Food Blog

Rosemary Garlic Roast Chicken with Honey and Grapes

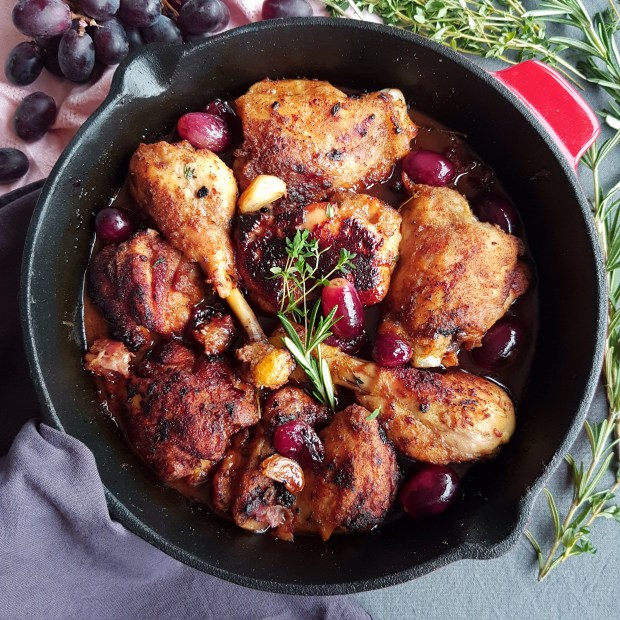
You really can’t beat a one skillet chicken dinner!

This seriously delicious chicken one pan dish is everything you want, juicy, tender, fall off the bone and crispy on the outside with a hearty finger licking gravy. Serve with lots of french baguette to mop up those juices.

Easy, healthy, comfort food. I mean, you can’t go wrong with Chicken.
I roast this chicken in my cast iron pan, because the crispiness and browning on the chicken is unsurpassable, and because the pan goes from the stove to the oven, which obviously is a major plus.

If you don’t have a cast iron pan don’t worry, any other frying pan will work too, but you will have to transfer the chicken to a baking dish when it goes into the oven.

I start by browning the chicken on the stove to get a nice browning on the chicken and to seal the meat, then I finish it off in the oven for another 20 minutes or so which gives you enough time to get your sides dishes ready and set the table.
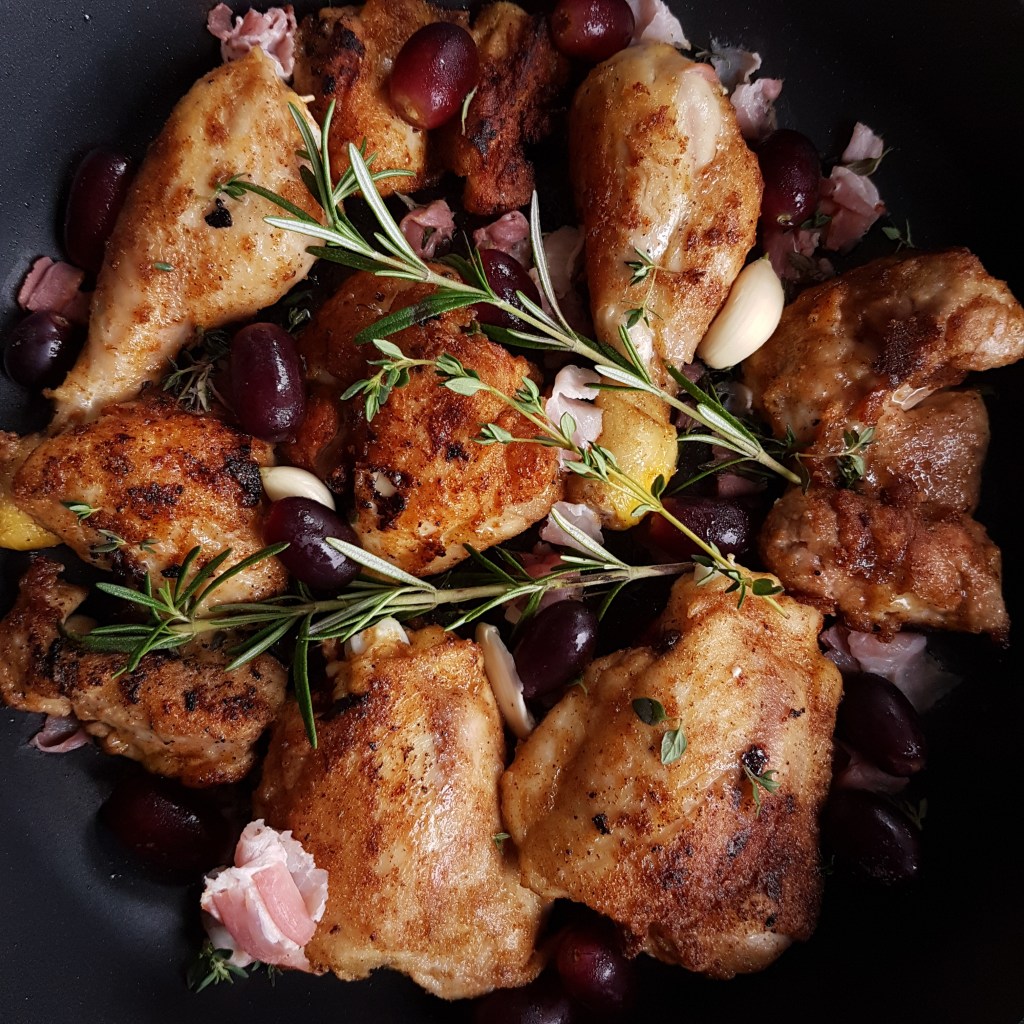
It’s seasoned with thyme, rosemary and garlic, and then I added some honey and grapes to make it the perfect comfort dish. I also added a splash of white wine for the gravy. Which by the way is an amazing gravy, full of flavour.
I don’t pour gravy over the chicken because I want to keep the chicken crispy.


 Prep time : 15 minutes

 Cooking time : 20 – 30 minutes

 Serves : 4

INGREDIENTS: 

  • 1/4 Cup olive oil
  • 2 lbs. chicken, legs and  thighs (I used legs and boneless thighs)
  • 3 cloves of garlic
  • 1/2 Cup red seedless grapes
  • 2 sprigs Rosemary
  • 1 tbsp. fresh Thyme leafs
  • Salt and pepper
  • 1 tsp. Poultry seasoning
  • 1 tsp smoked paprika
  • 8 rashers smoked bacon or pancetta
  • flour for drenching plus 2 teaspoons for gravy
  • 1 tbsp. honey
  • 1 large glass dry white wine

INSTRUCTIONS:

Pre heat oven to 190°C / 375° F

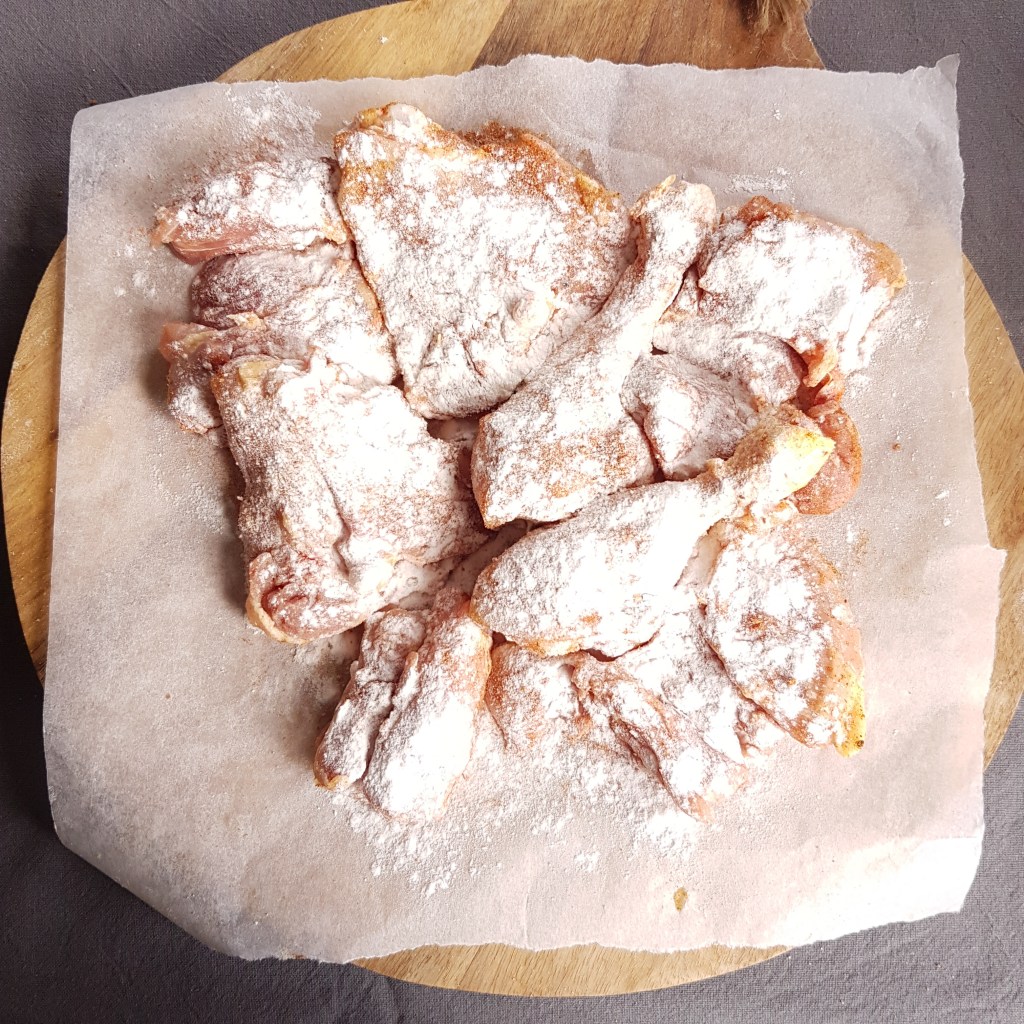
Take out a piece of parchment paper and lay it out on a board. This makes cleaning easier and seasoning too.

Place chicken pieces on top and season with salt pepper, poultry seasoning and paprika. Toss about by lifting the sides of the paper.

Add a few tablespoons of flour to the chicken and toss the chicken around again to coat all over.

Put a (cast iron) skillet on the heat. Add the olive oil when hot and start frying the chicken on both sides.

Meanwhile cut the bacon into small pieces and set aside. Peel the garlic and chop roughly.

When the chicken is browned, lower the heat and add the bacon, garlic and herbs to the pan. Stir around a bit to mix all the flavours and add the wine. Drizzle over the honey and add the grapes,   now transfer to the oven placing the baking dish on a rack in the middle of the oven and cook for 20 to 30 minutes until nice and crispy on top and cooked through.

Alternatively, if you don’t have a cast iron skillet, transfer to an oven safe dish that has been pre heated in the oven.

Serve with crusty bread.

Enjoy!

Myra

Healthy Salted Caramel Twix Bars

These home-made Twix Bars are a nutrient powerhouse!

Aside from being an easy, on the go snack, these nutrient powerhouses contain essential vitamins, minerals, protein and omega 3 fatty acids. Yes, they are super healthy and super delicious.  And they keep you full and satisfied for a long time.

The base of the twix is made with healthy oats, nuts and some maple syrup.

The caramel layer is made out of dates, some of the most impressive benefits of Medjool dates include their ability to lower cholesterol, lower blood pressure, aid bone strength, protect cognition, boost metabolism, ensure proper hormone production, optimize digestion and help with normal growth and development.
Medjool dates also contain notable levels of magnesium, manganese, copper and calcium, all of which are required to improve bone mineral density in the body. Even if blood tests show that you are not deficient in minerals, this could be because your body is extracting minerals from your bones, especially women are prone to calcium deficiency so adding essential minerals in every snack is an important health decision.

So what are you waiting for? Let’s make some Twix!
________________________________________

🔪 Prep time : 15 minutes
⏰ Cooking time : 25 minutes
🍪 Makes : 16 Twix


INGREDIENTS:
BASE
• 1 cup cashew nuts, preferably soaked for a few hours
• 2 cups oats
• ½ Cup (pea) protein powder
• ¼ tsp. salt
• ¼ cup flax seeds
• ¼ cup coconut oil melted
• ¼ cup peanut butter,
• ½ cup maple syrup or agave syrup or a combo of both (I use 50/50)
CARAMEL
• 1 cup (heaped, well packed) pitted medjool dates
• ¼ tsp. instant coffee granules
• A few drops of natural caramel extract (optional)
• A few tablespoons of water
CHOCOLATE TOP
• ½ cup roughly chopped 80% dark chocolate
• 2 tsp. coconut oil
• Flaked sea salt

INSTRUCTIONS:
1. Pre heat the oven to 350° F / 180° C
2. Drain the cashew nuts and pat dry.
3. Place all the dry ingredients in a high powered food processor and process until fine.
4. Transfer to a bowl.
5. Place the cashew nuts in the food processor and blend until smooth.
6. Place the dry ingredients back into the food processor.
7. Heat the peanut butter, syrup and coconut oil briefly in the microwave until just softened. Add to the rest of the ingredients.
8. Mix everything well.
9. Line a square 8” / 20 cm. baking pan with parchment paper
10. Place all the base ingredients in the baking pan and press down firmly.
11. Bake for about 20-25 minutes, or until golden on top and firm to the touch.
12. Remove from the oven and let cool on a rack in the pan.
Meanwhile make the caramel.
1. Place the dates in a sauce pan with a thick bottom to prevent burning and add the water.
2. Add the coffee granules
3. Cook slowly, stirring often to break down the dates completely. Add a little water if necessary.
4. This can take up to ten minutes depending on the dryness of the dates
5. Keep stirring until you have a thick paste. (that smells heavenly)
6. Add the caramel extract
7. Let cool completely.

When ready to assemble, spread the date caramel all over the cookie base, evenly.
Place in the refrigerator until firm and cooled. Or in the freezer if you are in a hurry
Melt the chocolate in 20 second intervals in the microwave until melted.
Spread evenly over the caramel and return to the fridge until set.
When you are ready to cut the Twix bars, make sure to immerse a sharp knife in hot water before cutting thru the chocolate or it will break unevenly. Cut into 16 squares.
Sprinkle over some flaked sea salt.
And I’m really wondering how long they will last in your home…..let me know, ok?

Enjoy!

Myra XO

Quick and Easy Pulled Pork Sandwiches

This is a super easy, no fail slow cooker recipe, put together in an instant.

Pulled Pork is one of my favourites to make and eat, since it’s packed with flavour and made with minimal effort. The Pork comes out very tender and juicy and stuffed into a sandwich,  it’s scrumptious .

Once you’ve placed the ingredients in your slow cooker, you can pretty much forget about it until you’re ready to eat.

This is also great for crowds and parties since you can leave the finished pulled Pork in the slow cooker on the “keep warm” setting for at least an other two hours.

Alternatively, you can freeze half and eat the the remainder some other day. It will keep in the freezer for about two months.

⏰ Prep time : 15 minutes
🍴 Cooking time : 4 hours.
🍝 Serves : 6 – 8

INGREDIENTS:

1/4 cup packed brown sugar
1 tablespoons chili powder
3 tbsp smoked paprika
2 to 3 sprigs thyme, leaves only
2 cloves garlic, peeled and grated
2 teaspoons salt
1 tbsp. Worcestershire sauce
1/2 tsp cayenne
1 teaspoon freshly ground pepper
3 tbsp olive oil
3 1/2 – 4 lbs. boneless pork shoulder, trimmed of excess fat
___________
1/4 cup chicken broth
1/4 cup apple cider vinegar
3/4 cup barbecue sauce

INSTRUCTIONS:

• In small bowl, mix brown sugar, chili powder, paprika, thyme, garlic, salt, cayenne, ground pepper and olive oil to form a paste.
Rub mixture all over pork.
• Marinate for a few hours if you have the time, it will taste great either way.
• Place in slow cooker.
• Pour broth and 1/4 cup of the vinegar over pork. Cover and cook on High heat setting 3 hours.
• Add a little water if the sauce evaporates to quickly.
• Add the Bbq sauce and cook for about an other hour until completely tender. Check by pulling away some meat with a fork.
• Remove pork to cutting board, and shred using 2 forks. Return to slow cooker and cook on low heat setting for about 20 minutes or until warmed.
• To serve, split buns open, and scoop out s big ladle of pulled pork with sauce onto the bun, top with pickles and/or coleslaw and cover with top halves of buns, eat immediately.
• Have plenty of napkins ready!

Enjoy!
Myra XO

Vanilla Layer Cake with fresh Strawberries and white chocolate whipped cream cheese frosting.

Vanilla Layer Cake with fresh Strawberries and white chocolate whipped cream cheese frosting.

Having a good homemade vanilla cake recipe in your repertoire will make life a lot easier for you. This particular cake is easy, light and full of vanilla flavor, so delicious and tender…and it’s pretty much the best vanilla cake recipe you’ll ever make!

So why not surprise your loved one this Valentine’s Day with this delicious vanilla cake with fresh strawberries and the most fluffy white chocolate cheesecake filling you have ever tasted?
Having a good vanilla cake recipe is wonderful since you can always adapt the frosting or buttercream to adjust to your taste or mood. Making a cake from scratch is also very rewarding, just follow the steps in the recipe and before you know it… you’ve got yourself a home-made cake!
This cake is actually fairly easy to make and has the most incredible vanilla flavour, the secret to success is having all the ingredients at room temperature. Then letting the cake cool in the tin after baking, these are important steps.
The cake can also be made one day in advance and in fact I encourage you to do so, since that makes frosting even easier and there is less pressure for you.

The frosting is pure heaven, like white chocolate cheese cake but softer and spreadable.

vanilla cake, strawberries white chocolate

INGREDIENTS:

Cake:
2 ¾ cups / 350 gr. all purpose flour* (see note)
¼ cup / 35 gr. corn starch
2 tsp./ 10 gr baking powder
1 tsp./ 5 gr baking soda
½ tsp. / 2.5 gr. salt
1 cup / 225 gr. butter at room temperature
1 ½ / 300 gr. cups sugar
4 eggs at room temperature
3 tsp./ 15 ml. vanilla extract
1 cup / 225 ml. full fat (Greek) yoghurt
½ cup / 120 ml. milk of choice
½ cup / 110 gr. good quality strawberry jam
2 cups / 400 gr. fresh strawberries

White chocolate whipped cream cheese frosting:
4 oz. / 112 gr. white chocolate, chopped
1 ¾ cup / 420 gr. cream cheese at room temperature
1 ¾ cup / 420 ml. whipping cream
¼ cup / 30 gr. powdered sugar
2 tsp. / 10 ml. vanilla extract
1 tsp. / 5 gr. gelatin powder

vanilla cake, strawberries white chocolate

vanilla cake, strawberries white chocolate

INSTRUCTIONS:

For the cake:

Pre heat the oven to 175 C / 350 F.
Grease two 8”/20cm round baking tins, line them with parchment paper and grease lightly with some butter or oil.
Cream the butter and sugar together in a stand mixer until completely soft and fluffy.
Add the eggs one at a time, beating until each egg is fully incorporated.
In another bowl combine all the dry ingredients.
Mix the yogurt with the milk in a jug.
Now set your mixer to the lowest speed and alternate adding flour and yoghurt mixture to the bowl with the butter and eggs, stirring after each addition. End with flour, stir to combine but try not to over-mix.
Divide the batter between the pans and place in the middle of the oven on a rack.
Bake for about 40 to 45 min or until a toothpick pierced in the center of the cake comes out clean and dry.
Remove from oven and leave to cool on a rack for at least 15 minutes  before removing the cakes from the baking tin.
Cool the cakes completely before frosting.

If you do make the cake a day in advance, leave them in the tins and cover very well with foil when completely cooled and place in a cool place or in your fridge overnight. Leaving the cake overnight in fridge makes frosting so much easier, this is a tip I actually got in baking school. 

For the white chocolate whipped cream cheese frosting;
Melt the white chocolate in the microwave, for 20 seconds at a time, stirring each time in between. I do this on the defrost setting of my microwave which is about 450 watt, white chocolate burns faster than regular chocolate so you have to be careful.
Meanwhile beat the cream cheese until completely smooth and soft in your mixer.
Start adding the whipping cream in a slow stream with the mixer running on a low setting. Add the powdered sugar, vanilla and gelatin. Turn th speed to medium high and whip for about 4 to 5 minutes until nice and fluffy.

To assemble the cakes, cut each layer in half, spread three layers with strawberry jam, then about half a cup of frosting,  spread out carefully over the jam. Place another layer of cake on top and repeat. The top layer only has frosting and no jam.
Carefully spread more frosting all around the cake for a naked cake look.
Decorate with more strawberries and flowers on the top and around the cake.

Enjoy !
Myra XO

If you make this Vanilla Cake, be sure to leave a comment! I’d love to hear from you and if you love it, pin it. And of course, if you do make this recipe, don’t forget to tag me on Instagram!