Tag Archives: Dessert

Orange Blossom Peach Tart, with a thin Vanilla Cheese cake layer.

IMG_1052

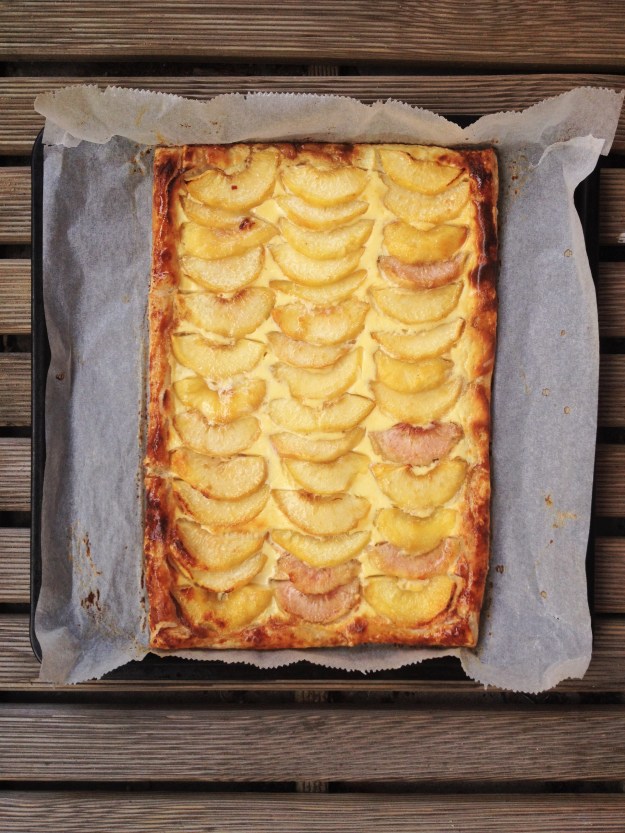
A quick an easy tart, a thin layer of cheese cake covers the crispy puff pastry crust and is covered with juicy peaches before being baked to perfections.

INGREDIENTS:

  • 8 squares of Puff Pastry, (12.5 oz/360 gr.)
  • 4 large juicy Peaches
  • 1/2 tsp. Orange blossom extract

Cheese cake layer:

  • 1/2 C. Cream Cheese, at room temperature
  • 1 large egg at room temperature,
  • 1/2 tsp. pure vanilla extract
  • 1 1/2 Tbsp. sugar

Glaze:

  • 1 tbsp. Honey
  • 1 tsp. warm water

plus;

  • 1 egg beaten for brushing puff pastry
  • 1 tbsp. sugar for sprinkling over border.

INSTRUCTIONS:

Pre heat oven to 425 ° F/ 220° C with a baking sheet in the oven to heat up. Pre heating the baking tray ensures a crispy golden tart bottom.

Peel the peaches, cut in half and remove the stone. Lay them with the flat side down and cut into slices lengthwise.

Put them into a bowl and add the Orange blossom extract. Leave to marinate while you prepare the puff pastry.

Lay out a piece of baking parchment and place 6 squares of puff pastry on it in a rectangular shape. The slices overlapping each other a little bit, press them together with your index finger. The rectangle should be about 14″x 9″.

In a small bowl beat 1 egg and brush the border with a pastry brush.

Cut the remaining 2 squares into strips and place them around the rectangle to form a border pressing very gently so it sticks to the beaten egg. It should have a “picture frame” shape.

In a bowl beat the cream cheese until smooth and add the beaten egg, vanilla and sugar. Mix well. Spread evenly over the puff pastry without covering the border. Now place the peaches over the cheese cake layer in three rows going down lengthwise. Brush the top of the border with the remaining beaten egg. Sprinkle the border with remaining sugar.

Place the peach tart with the parchment paper on top of the baking sheet in the oven. Lower the temperature to 360 °F/ 180° C. Bake for 40-45 minutes turning half way.

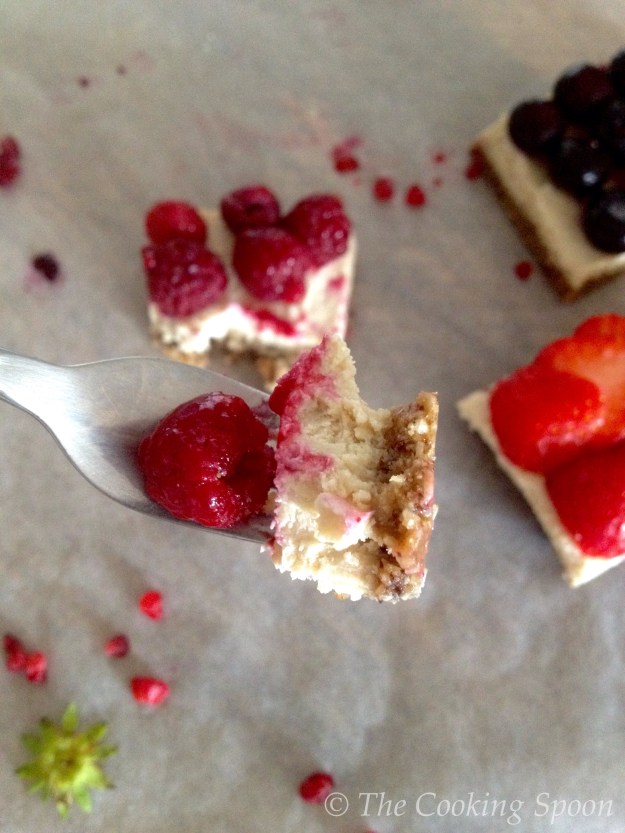
Remove from the oven. Mix the glaze and brush over the peaches. Cut in to squares, and serve as is or with whipped cream or maybe some vanilla ice cream.

Enjoy

Myra Xo

IMG_1051

IMG_1041

Macadamia-Cashew Bars with fresh berries

IMG_0059

There is just something so great about indulging and not having to feel guilty about it. Although these do have a lot of calories because of the nuts, but at least they are good for you.

I was very sceptical a few years ago when I stumbled upon the whole “raw”movement. I tried it for a month or two to give it a fair judgement and although it’s not for me, I do admire people who can live that way.

I found it hard to follow and I missed cooking too much. The great thing I discovered were the raw desserts. I mean, they really are the business, again, very calorie rich but also very rich in flavour and nutritious at the same time.

I guess what really works for me is to take the best from various life styles and put them all together.

Makes 16

Ingredients;

Base:
1 cup of pitted dates – soaked in warm water for 10 minutes
2/3 cup of almonds
2/3 cup of walnuts
2 tbsp cacao
1 tbsp coconut oil

Cream top;
1 cup cashews, soaked in  water overnight
1 cup macadamia nuts, soaked in water overnight
1/2-1 cup coconut water
1/2 cup coconut nectar
1/2 cup coconut oil
dash of salt
dash of vanilla

Fruit top:

2 C. mixed berries or other fruits of choice

Method;

The Base:
Into a food processor add your dates, and pulse for 10 seconds.
Add the rest of your ingredients and pulse for 10 seconds,  until combined. Don’t pulse for too long or your mixture will end up in one big lump.
Transfer your base into your 8×8 tray lined with baking parchment  and pat down evenly. Put in the freezer to set!

Cream base:
Into a blender add your  nuts,  1/2 cup coconut water, coconut nectar, oil, salt and vanilla. Blend till smooth. Add more coconut water to get a good consistency.
Put on top of the Base layer, and then freeze.
Let it sit in the freezer for about two hours before cutting in to squares and decorate with a variety of fruits.

IMG_0066

IMG_0057

Summer Fruit and Chocolate Slice

IMG_7435

These healthy bars are a real treat and so pretty.

For those of you are scared off by Tofu, I promise you, you can not taste any of it. It is just a neutral base that carries the flavors of the fruit and chocolate very well and is also loaded with protein rather than carbs. Why not give it a go. Easy and healthy rather than bad, what more could you ask for?

INGREDIENTS Crust:

  • 1/2 C. dates, pitted and soaked for 30 min.
  • 1/2 C. oats, (gluten free)
  • 1/2 C. nuts of choice
  • 1 tbsp. cocoa

INSTRUCTIONS:

Drain the dates and pat them dry, put in a food processor together with the remaining ingredients. Pulse for a few time until the mixture is crumbly.

Press into a square baking tin that has been lined with baking parchment.

Bake for approximately 15-20 minutes in a pre-heated oven at 400° F.

Remove when done and transfer to a rack to cool completely before filling.

Ingredients Pink Filling:

  • 1 C. silk tofu
  • 1 C. Summer fruit mix
  • 2 tsp. Agar Agar
  • 3 to 4 tbsp Stevia, or sweetener of choice
  • 1/2 C. raw Cashew Nuts, that have been soaked for 6 hours

Heat berries in a small saucepan, add the Agar Agar. Cook for 1 – 2 minutes. Set aside and let cool. Add the Stevia/Xylitol granules. Blend the Cashews in a food processor until silky smooth add a little of the tofu to get it going. Now mix with all the remaining ingredients.

INGREDIENTS Chocolate  Filling:

  • 1 C. silk tofu
  • 4 oz. dark chocolate 70%, sweetened with coconut sugar
  • 1 – 2  tbsp. raw cocoa powder
  • 3  tbsp Stevia, Xylitol or sweetener of choice
  • 1/2 C. raw Cashew Nuts, that have been soaked for 6 hours. Drained.
  • 1 tsp vanilla extract
  • 1 pinch of salt

Melt the chocolate au bain marie until melted. Remove from heat and let cool. Add the Stevia/Xylitol granules. Blend the Cashews in a food processor until silky smooth add a little of the tofu to get it going. Now mix with all the remaining ingredients.

To assemble:

Take spoonfuls of each mixture and place on crust alternating until you have used it all up. Make sure there are no air holes left. Shake the tin if necessary. Gently flatten to top with a spatula. Now with a knife draw a few “S”shapes in the filling for a rippled effect.

Put in the refrigerator for a few hours until completely set.

Nut rosettes for decorating the top:

  • 1 C. Cashew Nuts, soaked for 6 hours, drained
  • 1/3 C. Coconut cream, maybe a tablespoon more
  • 2 tbsp maple syrup

Mix all the ingredients in a high-speed blender or magic Bullet, blend until smooth. Put the mixture into a pastry bag fitted with a rose tip, make little roses on top of the slices.

IMG_7431

Black Bean Brownies

black-bean-brownies

The thought of being able to eat Brownies, that aren’t fattening, that aren’t full of nasty sugars or flour makes me very, very happy. It took me quit a while to get used to the idea of cooking with black beans in a sweet way. I have tried and tested a lot of “healthy” versions of Brownies, variations including Zucchini, Beet or Avocado and this is the first recipe that actually resembles  regular Brownies. In fact these are the only version my Daughter will eat without putting on a frown. They only take about half an hour to make in total and they freeze well too.

Pre-heat oven to 350° F

Ingredients:

  • 1 1/2 C. cooked and drained Black Beans
  • 3 Large eggs at room temperature
  • 3 tbsp. Coconut oil
  • 1/3 C. Cocoa powder
  • 1/2 C. Coconut sugar
  • 1 tsp. Vanilla extract
  • 1 1/2 tsp. Baking powder
  • a pinch of Himalayan salt
  • 1/2 C. dark chocolate chips (optional)

Low carb tigernut2

For the frosting;

  • 1/2 C. (raw ) cocoa powder
  • 1/4 C. coconut oil, melted
  • 1 tbsp. Maple syrup
  • 1/4 tsp. vanilla extract
  • a tiny pinch of Himalayan salt

Method;

Put the beans in a food processor and process until the beans are puréed. Add the eggs one at a time. Add the remaining ingredients, except the chocolate chips. Blitz until well mixed.

Pour into a 8″x 8″ baking tray lined with parchment paper and sprayed with cooking oil.

Sprinkle over the chocolate chips.

Bake for about 20-25 min. It should still be slightly soft in the middle when you shake the tray gently to test doneness. Remove from oven and transfer to a rack. Let cool completely before frosting.

For the frosting, just mix the ingredients in a bowl and spread over the brownies once the frosting has set.

Enjoy!

Myra XO

black bean brownies3