Category Archives: Breakfast

Spelt Soda Bread, dairy free

Soda Bread, dairy free.1

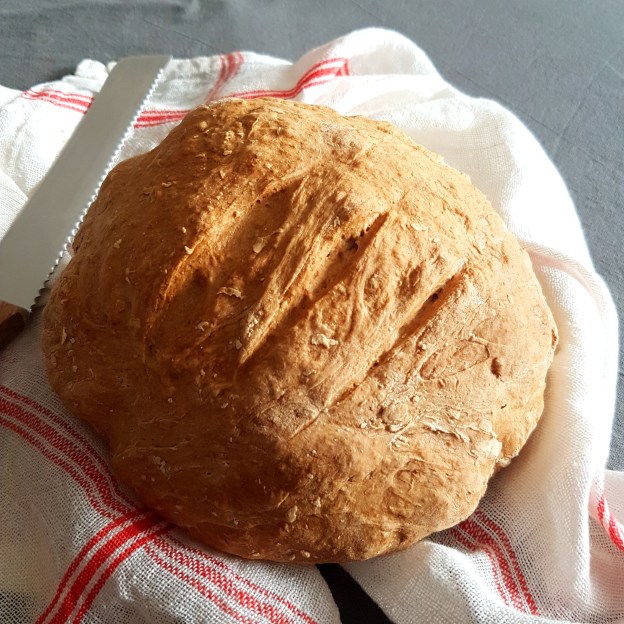
I’m going to hop right in to this….this Soda Bread is my favorite quick bread yet. It’s so fast that I won’t be buying bread for a long time. I can decide to make bread and 45 minutes later be eating it for lunch, we just love it.

The best thing about this Dairy free Soda Bread recipe is…..yes, you guessed it….it’s that it’s dairy free. So you don’t need to have buttermilk in the fridge.

Personally, I don’t enjoy the density that results of the use of dairy in a soda bread, it’s just too heavy for my taste, that’s why I came up with this version.

As you can see in the recipe below, it honestly couldn’t be simpler. Flour, baking soda, baking powder, salt a touch of honey and some plain vinegar to get the baking soda going, that’s it. Don’t let the vinegar scare you off, because it is just a little bit to replace the acidity from the buttermilk in conventional recipes. And you do not taste it at all.
I’ve been baking this Spelt Soda Bread every day for the last few months and my family absolutely loves it.

I use organic Spelt flour, so super healthy and absolutely no additives!

Give it a try, you’ll see what I mean. And I would love to hear your comments.
This loaf will keep for 2 days at room temperature but is best eaten the same day. It does freeze well. Freeze in a zip lock bag and take out slices as you need them.

This is a small loaf and will serve 3 to 4 people
Prep time is 10-15 minutes
Cooking time is 30 minutes

Soda Bread, dairy free.4

INGREDIENTS:

1 1/2 cups / 170 gr. whole grain Spelt flour
2 cups / 240 gr. white Spelt flour
1 tsp. / 5 gr. baking soda
1/2 tsp./ 2.5 gr. baking powder
1/2 tsp./2.5 gr. salt (for kosher salt you might need a little more)
2 tsp./ 10 ml. of honey
2 tsp./ 10 ml.  apple cider vinegar, or white vinegar
1 1/8 cups. / 270ml. cup hand warm water

INSTRUCTIONS:

Pre heat oven to 400 F / 200 C, with baking tray in the middle position of the oven.
Mix all the dry ingredients in a bowl. Gently mix together until well combined (I always use a whisk)
In a jug mix honey with water and vinegar and stir to combine.
Don’t mix bread until your oven is hot. This because baking soda only works for about 30 minutes, we need all the leavening action we can get so wait until oven is hot!
Then add water/honey/vinegar mixture to flour mixture and stir to combine. Quickly shape into a ball, adding a little extra flour if you need it. Place on parchment paper and make a cut or two in the ball of dough. Quickly place in the oven and bake for 30 minutes.
The loaf should sound hollow when tapped on, also pierce with a wooden skewer all the way through to make sure loaf is thoroughly cooked.
A great little tip is to place a small (oven safe) bowl with hot water in the back of the oven, moisture will help rise the dough and I actually do this with all my breads. I hope you love this loaf as much as we do.

Enjoy!

Soda Bread, dairy free.1

A Spelt Soda Bread to remember!

Peaches and Cream Baked Oatmeal

Being a fan of Baked Oatmeal like I am, I rarely eat anything else for breakfast, the need for variation is almost a necessity. For this dreamy baked oatmeal recipe I was inspired by the classic Peaches and cream combination, perfect with all the juicy ripe Peaches available now. Since I wanted to make it spectacular in taste I added creamy Ricotta, and a lot of vanilla. It’s so so good, it’s basically dessert.

The baked oatmeal ends up with an almost pudding-like center (due to the ricotta) , a crispy exterior and juicy peach in every single bite. I have to say, this is now my favourite Summer breakfast. It honestly tastes like a decadent dessert, drizzle with a little honey, add a spoonful of Greek yoghurt or more Ricotta and you have yourself a dreamy breakfast that is easy to prepare ahead of time and super healthy too.

So, about the ingredients…

Peaches – Use yellow Peaches if you can, since they have a more intense Peach flavour that their white cousins.

Eggs – Eggs give lift and give the oatmeal structure, it also adds a good amount of proteins and nutritional value. 

Honey – you can adjust the amount to taste, it gives the baked oatmeal a sweet flavor that goes perfect with the Peaches and the Vanilla.

Baking powder – also for a good lift, making the baked oatmeal more cake-like

Cinnamon and nutmeg – just a hint of these two spices is enough to give the Oatmeal that something extra

Vanilla extract – use real vanilla bean if you can, otherwise a good extract. Vanilla is a must. 

Salt – a pinch of salt is what keeps it from tasting bland.

Milk – Use any kind of milk you like, the fattier the milk, the creamier the baked oatmeal will be. Plant milk works too.  

Butter – Let’s be real, is there anything better than butter, even a few tablespoons can work a miracle, it adds a lot of flavour and improves texture.

Oats – quick cooking oats this time, since I wanted a creamier end-result. 

Ricotta – adds all the creaminess.


Prep time : 15 min

Cooking time : 30

Serves : 6-8

INGREDIENTS:

  • 1 tbsp. melted butter for baking dish
  • 4 to 5 Peaches, not too ripe
  • 4 cups/400 gr. quick cooking Oats
  • 1 tsp. baking powder
  • 1/2 tsp. baking soda
  • 1/2 tsp. Cinnamon
  • 1/8 tsp. grated Nutmeg
  • 1/4 tsp. salt
  • 2 large eggs, room temperature
  • 1/4 cup/60 ml. melted butter
  • 1/3 cup/80 ml. Honey
  • scraping of one Vanilla bean or 2 tsp. Vanilla extract
  • 1/2 cup/120 ml. full fat Greek Yoghurt
  • 1/2 cup/120 ml. milk of choice
  • 1/3 cup/120 ml. Ricotta

INSTRUCTIONS:

Preheat the oven to 350F/180C. Grease a 8 x 10 inch baking dish, or similar with the tablespoon of butter.
In a large bowl combine the dry ingredients, the quick-cooking oats, the baking powder, baking soda, the cinnamon, the nutmeg and the salt. Stir to combine well. 
In another bowl beat the eggs, the melted butter, the honey, the vanilla, the yogurt, the milk and the Ricotta.

Peel the Peaches*, slice in half, remove the the stone by twisting the halves, then cut into wedges. Divide into two portions.
Add the wet ingredients to the dry and mix to combine. Pour half the oat mixture into the greased baking dish and layer half the Peaches over the oats, cover with the remaining oats and place the remaining Peaches on top in a decorative pattern. Brush the Peaches gently with a little oil or use a little cooking spray, this will prevent them from burning or going to dark. Bake for 30 minutes, serve with additional Honey if desired and more Cream or Yoghurt.

Enjoy!

  • *If you are having trouble peeling the Peaches, you can cut a small cross into the crown of the Peach, plunge them into a pot of (no longer) boiling water for one or two minutes, until the skin cracks open then remove them straight away into an ice bath, then proceed to peel.

If you make this recipe please be sure to leave a comment and/or give this recipe a rating! I love hearing from you.  And please don’t forget to tag me on Instagram so I can see your creations!

Crêpe Suzette filled with honey cream cheese

A non-boozy version of a delicious French Classic.

Instead of the Grand Marnier, triple sec or orange Curaçao liqueur that most Crêpe Suzette recipes call for, I have made an Orange syrup to pour over the Crêpes, perfect for the whole family. An added bonus is that you don’t have to flambé the Crêpes either, so it’s super simple. They’re also filled with whipped honey cream cheese and served with fresh Orange segments to add freshness. A true feast that the whole family will love.

Serves: 4

Prep time : 10

Total Time : 20 minutes

INGREDIENTS:

Crêpes:
• 1 1/4 cup all-purpose flour or white spelt flour
• Pinch salt
• 2 eggs at room temperature
• 1 1/4 cups milk
• 1 teaspoon vanilla extract
• 2 tbsp. melted butter
• + 1/2 cup butter for baking the crepes
Orange Syrup:
• 1 1/2 cups freshly squeezed orange juice
• 5 tablespoons sugar
• 2 tsp. Cornstarch mixed with 1 tbsp. water
Honey cream cheese:
• 3/4 Cup cream cheese at room tempered
• 1/4 cup honey
• 1/8 tsp. Orange blossom extract (optional)
Extra for serving:
• 2 oranges, peeled and sectioned, skin removed

DIRECTIONS:

Crêpes:
Whisk together the flour and salt in a medium bowl. In another bowl whisk the eggs, milk and vanilla. Add to the flour slowly and whisk until combined, add the melted butter and mix. If the mixture is too thick, add a little more milk until a thin consistency is achieved. Cover and refrigerate for 30 minutes. It’s important to let the batter rest, so the gluten can develop and the Crêpes will bake easier and they won’t tear as easily.
Heat an 20cm/8-inch skillet over medium heat for about 1 minute. Add butter to the pan and swirl it around so the butter covers the entire surface. Ladle some batter onto the middle of the pan and immediately start swirling the pan to distribute the batter over the surface. Cook for 60 seconds or until lightly golden brown. Add a little butter to the uncooked side and flip over and cook the other side for 30-60 seconds. Remove to a plate and repeat with the remaining batter.
You may keep the crepes warm on a plate set on top of a pan with simmering water or covered with foil in a low-warm oven
Orange sauce:
In a sauce pan over high heat, bring the orange juice to a boil with the sugar, reduce the heat to a simmer, add the cornstarch slurry and cook until the mixture has thickened, about 5-10 minutes. Remove from heat and set aside.
Honey cream cheese:
Place the cream cheese in a bowl together with the honey and whip for a few minutes until fluffy and creamy. Add orange blossom extract if desired.
To serve:
Place a crepe on a warm plate. Spoon some cream cheese down the middle and roll the crêpe into a cylinder. Top with syrup and fruit and serve immediately. Serve 2 crêpes per person.

Enjoy!

Double chocolate zucchini banana bread

Chocolate zucchini banana bread

One bowl and 15 minutes, that’s all it takes.

Death by Chocolate cake is the first thing that comes to mind when I think about this dense chocolatey zucchini banana bread.

It’s by far our favorite one.

Intensely chocolaty…with chocolate in the batter and more chocolate in the form of chocolate chunks, and plenty of them. Soft gooey puddles of chocolate throughout, a tender crumb and so perfectly soft yet firm enough to slice effortlessly.
There’s just something about homemade banana bread that I find irresistible, add chocolate to the equation and you’ve got yourself the perfect breakfast, tea or dessert loaf.
About the ingredients, when it comes to  cocoa, I like to get the best quality I can get my hands on.  It’s worth the extra money.
The yoghurt may come as a surprise but it is perfect to balance out the intense chocolate flavor. 

INGREDIENTS:

  • 1 1/2 c. grated zucchini (after squeezing dry), about 1 large
  • 1 cup bananas mashed, about 2 large
  • 2 eggs
  • 1/4 cup melted coconut oil
  • 1/2 c coconut sugar
  • 1/4 cup regular plain yoghurt
  • 2 tsp. vanilla
  • 1 1/2 c all purpose flour
  • 1/2 cup whole grain flour
  • Pinch of salt
  • 1/3 c cocoa powder
  • 1 1/2 tsp. baking powder
  • 1/2 tsp. baking soda
  • 1/2 cup chopped dark chocolate or  chips

INSTRUCTIONS:

Pre heat the oven to 180C/350F. Line a buttered loaf tin 22cm/9″ with parchment paper.

Start by grating the zucchini with a medium grater onto a kitchen towel. Bring the corners of the towel together and squeeze out all the moisture. Set aside.

In a large bowl mash the bananas with a fork, add the eggs, coconut oil, sugar, vanilla and yogurt. Beat together until well combined. Add the zucchini and stir to combine.

In a separate bowl combine the flour, salt, cocoa, baking powder and baking soda. Now add the wet ingredients to the dry ingredients. Use a spatula to combine without over mixing.

Chop the chocolate leaving some chunks, mix into the batter. Alternatively add the chocolate chips.

Pour batter into prepared loaf tin, smooth out the top of the batter with a small spatula and place in the middle of the oven.

Bake for about 55-60 minutes, insert wooden skewer to check, if it comes out dry it’s done.

Remove from oven and let cool on a rack for about 10 minutes. Remove from loaf tin, leaving on the parchment paper and let cool completely before cutting.

This loaf will keep for 3 to 4 days, or you can slice and freeze individual portions.

Enjoy!

Spread with some extra Nutella…for a full chocolate explosion 🙂