Author Archives: The Cooking spoon

Matcha Cupcakes with White Chocolate Buttercream

Let’s talk about Matcha.

Matcha is the finely ground powder of specially grown and processed green tea.

It is special because the green tea plants for Matcha are shade-grown for about three weeks before harvest, this is how it produces more theanine and caffeine.  This combination of chemicals is considered to account for the calm energy people might feel from drinking Matcha. The powdered form of Matcha is consumed dissolved in water or milk.
I love Matcha dissolved in almond milk sweetened with a little honey. Known as the “Matcha Latte”. And the calm energy part is the perfect description of the energy you feel after a cup of Matcha, it’s not like when you drink too much coffee, where you might feel uncomfortable with a raced feeling. Matcha just gives you tons of energy due to the high levels of Theanine. Theanine makes the brain produce alpha waves, which induce a state of relaxation and focused attention, similar to meditation. Matcha has a high amount of EGCG, a plant chemical that stimulates cell suicide in unhealthy cells, and stimulates metabolism as well.
It also has one of the highest ORAC values and is therefore a potent antioxidant. The ORAC value for Matcha is 1348 units per gram, compared to 24 units for blueberries.
The ORAC (Oxygen Radical Absorbance Capacity) unit, ORAC value, or “ORAC score” is a method of measuring (in vitrio) the antioxidant capacity of different foods and supplements. The higher the food on the ORAC scale the more effective it will be at neutralizing free radicals.

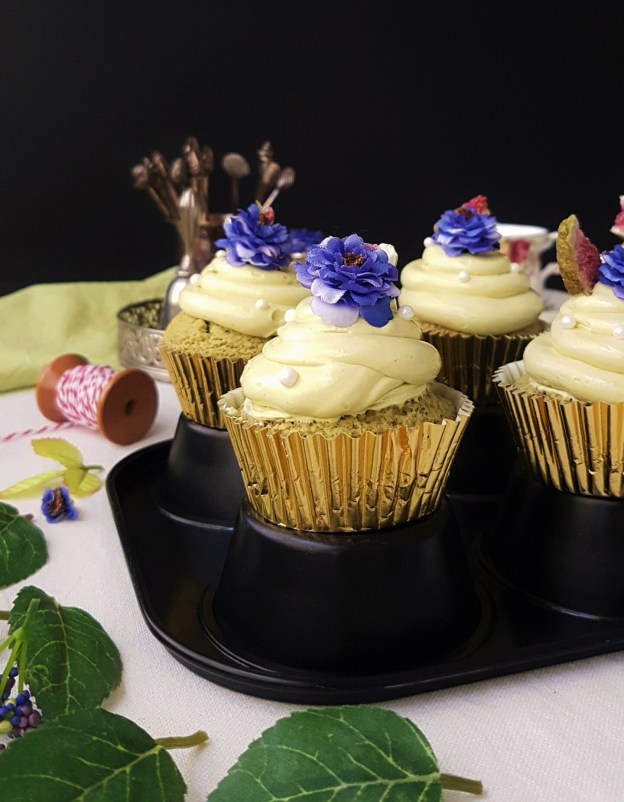
Since I love  Matcha so much I have come up with many ways to incorporate it into baking. Today I’m sharing one of my favourite recipes for Matcha Cupcakes,  with a delicious white chocolate buttercream.

Makes: 12 Cupcakes

INGREDIENTS:

For the Cupcakes;

  •  1 1/2 Cup all purpose flour
  • 1 tbsp. Matcha green tea powder, culinary grade
  • 1/8 tsp. salt
  •  1 tsp. baking powder
  • 1 Cup sugar
  • 1/2 Cup butter or margarine
  • 3 large eggs
  • 1/2 Cup Buttermilk + 1/4 cup milk, mixed in a jug

For the Buttercream;

  • 5 oz. white chocolate
  • 1 Cup butter at room temperature, cut into cubes
  • 1/4  Cup confectionary sugar
  • 2 tsp. Matcha powder

INSTRUCTIONS:

  1. Sift flour, Matcha, salt and baking powder together into a bowl.
  2. In the bowl of an electric mixer, cream butter and sugar until light and fluffy.
  3. Add eggs, one at a time until incorporated. Make sure to scrape down the bowl.
  4. Meanwhile line a cupcake tin with liners and pre heat the oven to 180° C. / 350° F.
  5. Mix the flour mixture into the egg mixture alternating with the buttermilk, mix with a spatula and do not over mix.
  6. Fill the cupcake liners half way.
  7. Place on a rack in the middle of the oven and bake for about 18 to 20 minutes or until a wooden skewer inserted in the middle of a cupcake comes out dry.
  8. Remove from oven and let cool completely on a rack before frosting.

To make the buttercream;

  1. Melt the white chocolate au bain-marie by bringing a pot of water to a simmer, suspend a bowl in the pot without touching the water, break up the chocolate into smaller pieces and place in the bowl, leave to melt stirring occasionally with a rubber spatula .
  2. Meanwhile beat the butter with your mixer until fluffy, slowly add the confectionary sugar and the Matcha powder, mix until well incorporated.
  3. Once cooled, slowly add the melted chocolate and beat quickly to incorporate.
  4. You may have to put the butter cream in the fridge for half an hour if it is too soft before piping onto the cupcakes.

To assemble:

  1. Simply place the buttercream in a piping bag and put on your favourite tip. Squeeze the buttercream gently in a circular motion over the cupcake until you have a nice peak. Decorate with flowers and/or sprinkles.

Enjoy!

Double chocolate zucchini banana bread

Chocolate zucchini banana bread

One bowl and 15 minutes, that’s all it takes.

Death by Chocolate cake is the first thing that comes to mind when I think about this dense chocolatey zucchini banana bread.

It’s by far our favorite one.

Intensely chocolaty…with chocolate in the batter and more chocolate in the form of chocolate chunks, and plenty of them. Soft gooey puddles of chocolate throughout, a tender crumb and so perfectly soft yet firm enough to slice effortlessly.
There’s just something about homemade banana bread that I find irresistible, add chocolate to the equation and you’ve got yourself the perfect breakfast, tea or dessert loaf.
About the ingredients, when it comes to  cocoa, I like to get the best quality I can get my hands on.  It’s worth the extra money.
The yoghurt may come as a surprise but it is perfect to balance out the intense chocolate flavor. 

INGREDIENTS:

  • 1 1/2 c. grated zucchini (after squeezing dry), about 1 large
  • 1 cup bananas mashed, about 2 large
  • 2 eggs
  • 1/4 cup melted coconut oil
  • 1/2 c coconut sugar
  • 1/4 cup regular plain yoghurt
  • 2 tsp. vanilla
  • 1 1/2 c all purpose flour
  • 1/2 cup whole grain flour
  • Pinch of salt
  • 1/3 c cocoa powder
  • 1 1/2 tsp. baking powder
  • 1/2 tsp. baking soda
  • 1/2 cup chopped dark chocolate or  chips

INSTRUCTIONS:

Pre heat the oven to 180C/350F. Line a buttered loaf tin 22cm/9″ with parchment paper.

Start by grating the zucchini with a medium grater onto a kitchen towel. Bring the corners of the towel together and squeeze out all the moisture. Set aside.

In a large bowl mash the bananas with a fork, add the eggs, coconut oil, sugar, vanilla and yogurt. Beat together until well combined. Add the zucchini and stir to combine.

In a separate bowl combine the flour, salt, cocoa, baking powder and baking soda. Now add the wet ingredients to the dry ingredients. Use a spatula to combine without over mixing.

Chop the chocolate leaving some chunks, mix into the batter. Alternatively add the chocolate chips.

Pour batter into prepared loaf tin, smooth out the top of the batter with a small spatula and place in the middle of the oven.

Bake for about 55-60 minutes, insert wooden skewer to check, if it comes out dry it’s done.

Remove from oven and let cool on a rack for about 10 minutes. Remove from loaf tin, leaving on the parchment paper and let cool completely before cutting.

This loaf will keep for 3 to 4 days, or you can slice and freeze individual portions.

Enjoy!

Spread with some extra Nutella…for a full chocolate explosion 🙂

Yeast free Spelt Bread

In your belly within the hour!

When you need bread in a hurry, this is the recipe for you!
There’s no yeast, no waiting for the dough to rise, no kneading and no need to live without bread because the supermarket has run out of yeast again. We’ve all been there.

All you need are a few simple ingredients. This yeast free spelt bread is so easy to make, because you just have to stir a few ingredients together and shape the dough into a loaf. I’ve used Spelt flour but you can easily swap it out for all purpose flour, see notes below.

Prep time : 15 min
Cooking time : 50-55 min
Makes : 1 loaf

Oven: 350F/180C

INGREDIENTS:

• 2 tbsp./10 gr. Psyllium husk powder*
• 1 cup/ 250 ml. water
• 1 cup /250 ml. milk
• 1 tbsp./15 ml. honey
• 1 tbsp. /15 ml. neutral oil or melted butter
• 2 tsp./10ml. plain Vinegar
• 1 cup/115gr. whole grain Spelt flour**
• 3 cups/360gr. plain white Spelt flour**
• 4 tsp./ 12 gr. baking powder
• ½ tsp./ 3 gr. baking soda
• 1 ½ tsp./ 9 gr. Salt


INSTRUCTIONS:

1. Pre heat oven to 350F/180C.

First you mix the one cup of water with the Psyllium husk powder in a bowl and let it sit for 10 minutes until a jelly forms.
2. In a measuring jug, add the one cup of milk and warm in the microwave for 30-45 seconds until warm to the touch. Add the butter and honey and stir to dissolve. Mix this with the Psyllium/water mix in the bowl. Stir to combine and add the vinegar.
3. In a large bowl add the whole grain flour, the plain flour, the salt, baking powder and baking soda, stir with a whisk to combine well.
4. Add the wet ingredients to the dry ingredients and stir with a wooden spoon until combined and continue with your hands, start shaping a loaf in the bowl. Wet your hands with water because the dough will be quite sticky. Add a little extra flour if the dough seems too wet.
5. Transfer the loaf to the lined baking tin and make a few cuts in the loaf with a sharp knife. Place in the oven and bake for 50 to 55 minutes until golden on top. And when tapped with your fingers, it will sound hollow. Alternatively you may insert a wooden skewer, it should come out dry.
6. Remove from the oven once fully baked and let it cool completely before cutting.
7. This bread will keep well wrapped or in a Tupperware for several days. You can also freeze this loaf.

Enjoy!

*Psyllium husk really improves the texture of the loaf, it gives a golden crunchy crust, bouncy soft texture and it helps rise the dough.
** You can use regular flour if you prefer, but use a little less, about 3 ½ cups total flour to begin with, you can always add a little more.

If you make this Yeast free Spelt Bread , be sure to leave a comment! I’d love to hear from you and if you love it, pin it. And of course, if you do make this recipe, don’t forget to tag me on Instagram! @thecookingspoonblog or hashtag it #thecookingspoonblog

Strawberry Cloud Cheesecake

A fluffy cloud like Strawberry mousse sits atop this luscious creamy Vanilla Cheesecake.

The BEST part is, it’s a 2 Ingredient Mousse. It also happens to be ridiculously easy. Normally I’m not someone to use an instant pack of anything but I happened to get a few packs of Jello thru a promotion, and I have to say the flavour was surprisingly delicious and my goodness, how easy. And sometimes it’s ok the take a shortcut…

The Cheesecake is a basic Vanilla Cheesecake to which I have added some Greek Yogurt, this adds a nice tanginess to balance out the sweetness.

So…back to the Strawberry Mousse, if you mix instant Jello with heavy cream, you won’t believe the awesomeness it creates! It’s like a fluffy cloud of soft mousse made in 1 minute!

I made this Cheesecake recipe with Valentine’s Day in mind, but you could make it anytime you’re in the mood for a decadent Strawberry dessert.

Prep time : 20 min.

Cooking time : 60 min.

Serves : 6


Ingredients mousse:

2 tbsp. Strawberry Jello
1 cup whipping cream

Ingredients vanilla cheesecake:

  • 250 grs / 9 oz. cookies for crust
  • 100 gr. / 1/2 cup melted butter
  • 700 gr. / 3 cups+1 tbsp. cream cheese at room temperature
  • 100 gr. / 3.5 oz. full fat Greek Yoghurt
  • 3/4 cup sugar
  • 1 tbsp. vanilla
  • 1 tbsp. cornstarch
  • 3 large eggs
  • Meringue kisses to decorate (optional)

Instructions:

1. Pre-heat oven to 160C/315F. Butter and line a 20cm/8″ loose-bottomed tin with baking parchment. Put the cookies in a plastic food bag. Flatten bag to remove excess air, then seal bag. Crush to crumbs using a rolling pin or alternatively blitz in a food processor. Transfer to a bowl, then pour over the melted butter. Mix thoroughly until the crumbs are completely coated. Tip them into the prepared tin and press firmly down into the base to create an even layer. Chill in the freezer while you make the filling.
2. In a large bowl or stand mixer beat cream cheese, yoghurt and sugar until combined and smooth, add the corn starch and vanilla and blend until well combined. Add eggs, 1 at a time, beating until blended after each addition. Pour into crust. Place on a baking sheet.
3. Place in the middle of the oven and bake for 45 to 50 minutes or until center is almost set. Turn off the oven and open the door just a tiny bit (I put a large wooden spoon in the opening or a folded tea towel), leave the cheesecake in the oven for another 30-60 minutes. This will prevent the cheesecake from cracking. Remove from oven and cool at room temperature until no longer warm to the touch. Then refrigerate for at least four hours but preferably overnight.

When you re ready to serve the Cheesecake make the Strawberry Cloud Topping by tipping one cup of whipping cream into a bowl. Start beating until it begins to thicken and add the two tablespoons of Strawberry Jello powder. Continue beating until cream is stiff and fluffy. Spread over the Vanilla Cheesecake and decorate if desired with meringue kisses.

Enjoy!

More Strawberry related goodies…